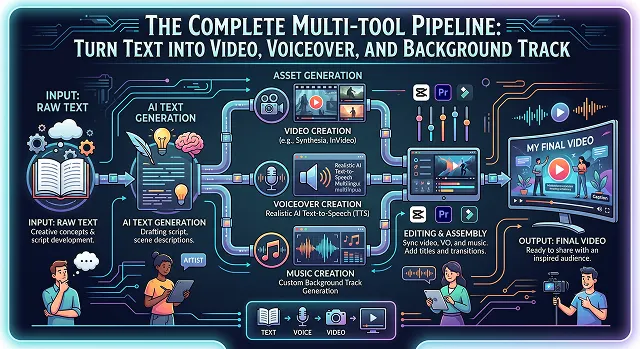
There was once a time when making a short video required a whole production team. You needed someone to write the script, an artist to record dialogue, a videographer to edit b-roll, and a sound designer to overlay music. If you were an independent creator or even a small marketing team, the effort that was needed in terms of time, money, and software could easily grind your work to a halt.
The advent of generative technology has flipped everything on its head. This is the age of the multi-tool pipeline.
You don’t need five paid services to switch back and forth between or a large desktop application to create one scene anymore. Using linked artificial intelligence, you can create a movie-quality video from a text idea, customize the dialogue, and add the appropriate background music in minutes.
This is the ultimate guide to the process of creating a multi-tool pipeline.
Step 1: The Step-by-Step Multi-Tool Pipeline Workflow
To ensure your visuals, voice track, and rhythm layers are perfectly balanced without experiencing visual drift or flat rendering waxy skin flaws, run your script through this sequence:
1. Generate Your Custom Voiceover Track
- Do not generate video first. Always start with your voice core. Head to the Voice Cloning tool. Upload a brief 10-second vocal sample to map your unique acoustic signature, paste your text script, and let the semantic engine render a natural, expressive voiceover file. Download this master track.
2. Render Your Video Clips via the Four-Element Prompt Setup
- Open the Video Studio panel. To get hyper-realistic outputs, feed the text engine using the Four-Element Framework: Subject + Style + Motion + Atmosphere. Example: "Widescreen cinematic tracking shot of a silver sports car speeding down a wet highway, lit by soft golden hour sun, photorealistic textures." Run the generation block to output your high-res video clip.
3. Synthesize a Mood-Matched Background Track
- Visit the AI Music Generator site. Choose the genre you require (such as Ambient Lo-Fi if creating an educational video, or Orchestral Cinematic if creating a storytelling one). Adjust the pace settings to match your cloned voiceover track and then hit the generate button to create your new royalty-free sound.
4. Stitch, Lock, and Upscale the Assets
- Place the new visual file, voiceover, and the accompanying music background into a timeline editing tool. Turn down the volume level of the music background track by 12 decibels to ensure that it remains below the voiceover track. In case you think your video file is slightly compressed, go ahead and use the 4K Video Enhancer.
Step 2: Crucial Pipeline Tuning Tips (The Editor's Edge)
When you are combining multiple AI layers together, small mechanical disconnects can ruin the illusion of reality. Use these professional tips to bridge the gap between text and high-end cinema:
1. The Audio-Driven Physics Law
If your text prompt describes heavy actions—like an explosion, a wave breaking, or a car engine revving—the video will feel cheap if the sound doesn't match the motion perfectly.
- The Fix: Make use of your tool's Native Audio Synthesis parameters inside the Video Studio panel. This tells the underlying physics engine to automatically align low-frequency background sound effects directly with visible physical impacts on the screen.
2. Lock Your Visual Character Anchor
If you are generating multiple sequential video bursts to tell a long story, text-to-video engines can suffer from style drift (meaning the main character or object changes appearance across different shots).
- The Fix: Before generating shot 2, drop the final frame of your shot 1 video directly into the Upload & Drop input slot of your workspace. By shifting from pure text-to-video to an Image-to-Video workflow, the AI reads your original lighting, clothing, and asset depth, keeping the visual look completely stable.
Multi-Tool Pipeline Matrix
Production Orchestration · Key Creative Advantage Benchmarks
| Operational Phase | Core Task | Niche Web App Tool | Key Creative Advantage |
|---|---|---|---|
| Phase 1 | Vocal & Dialog Synthesis | Voice Cloning | Clones your custom vocal tone from a brief audio sample. |
| Phase 2 | Widescreen Visuals | Video Studio | Generates high-fidelity cinematic physics from text prompts. |
| Phase 3 | Audio Pacing & Scoring | AI Music Generator | Compiles royalty-free background tracks perfectly matching the vibe. |
Request A Custom AI Video
Tell us what you're trying to create and we'll point you to the right tool — or help you set it up.
Step 3: Fixing High-End Compositing Anomalies
When you extract a highly complex subject—such as a model with fine hair strands or an animal with thick fur—and layer them onto a new background, they can still look artificial if the lighting physics do not match perfectly. This section addresses the technical step-by-step solutions to fix those extraction flaws.
1. Reconstructing Inter-Hair Semantics
With hair being photographed on the background of very saturated colors such as bright green chroma key screen and blue skies, the light bounces on to the individual hairs leaving small pieces of the background colors trapped within the hair structure.
- The Technical Fix: Do not attempt to manually erase these intersections. Instead, use a Neural Non-Destructive Layer Mask. In your editing workspace, create a new clipping mask mapped directly over the edge boundary. Set the blending mode exclusively to Color. Use a soft brush to sample the true, native hair color from the center of the subject's head, and gently paint over the outer edge. This digitally neutralizes the trapped color spill without wiping away the single-pixel strands.
2. Solving Translucent and Refractive Overlays
Isolating objects like glass bottles, rising smoke, or wedding veils requires maintaining transparent variations rather than a flat cutout. If a tool treats glass like a solid opaque wall, it destroys the realistic feel of the asset.
- The Technical Fix: Use a physics-aware Alpha Matte Engine. During export, ensure your tool isolates the luminance data of the transparent element. By converting the lighting values into a variable opacity scale, the final asset allows the textures of any new background to show through the glass or smoke layer realistically.
Diagnostic Checklist: Resolving Edge Matte Glitches
Glitch 1: "The Halo Effect" (Bright Boundary Outlines)
- The Root Cause: This happens when an image features intense backlighting during photography. The light spills over the subject's shoulders, creating a thin white line that the AI interprets as part of the foreground.
- The Fast Fix: Apply a fine-tuned Defringe/Choke command. Contract the boundary vector map inward by a microscopic fraction (0.5 to 1{px}). This cleanly shears away the bright border pixels without altering the main shape of your object.
Glitch 2: "Jagged Edge Tearing" (Pixelated Staircasing)
- The Root Cause: Processing a low-resolution input file forces the AI engine to guess jagged edges across soft curves, turning round shapes blocky and pixelated.
- The Fast Fix: Do not perform background masking on compressed thumbnails. Pass your low-resolution file through a 4x Image Upscaler first. Boosting the base pixel density allows the background removal net to generate smooth, natural edge contours.
Multi-Tool AI Pipeline
Connect separate video, voice, and audio tools into a high-efficiency production engine.
All-in-one web generators are convenient, but they often make compromises, giving you weak voiceovers or generic stock music. A multi-tool pipeline stacks specialized industry leaders: you generate pristine cinematic scenes using Google Veo 3.1 or Kling 3.0, extract crystal-clear human narration via ElevenLabs, and compose high-fidelity background music using Suno or Udio. This approach guarantees maximum quality for every element of your layout.
Break your raw concept script into short descriptive scene blocks. Instead of pasting a massive paragraph, feed engines like Kling 3.0 or Runway individual visual prompts using the standard formula: [Subject] + [Setting] + [Camera Trajectory]. Generate your video elements as independent 5-to-10 second clips first. This clean separation keeps characters stable and gives you total control when cutting the assets together later.
Always render your voiceover narration first before fine-tuning video lengths. Audio pacing dictates the entire rhythm of an edit. Once you export your high-fidelity speech file from ElevenLabs, drop it onto your editing timeline. Now, place your AI video clips directly above the audio file. Use standard tools like CapCut or Premiere to trim or stretch the video clips so visual scene changes match the narrator's vocal pauses perfectly.
Run your core project themes through specialized audio engines like Suno or Udio. To keep the background music from clashing with your voice actor, use explicit instrumental text markers like: "Ambient cinematic strings, low dark-synth bass pads, steady minimal lo-fi percussion loop, instrumental only, no vocals, corporate tech presentation mood." This generates a clean, royalty-free background track that sets the right tone without distracting listeners.
Audio ducking automatically balances your sound layers so they don't fight for attention. If your music and voiceover track play at the same volume, the narration becomes impossible to understand. Turn on the Automated Audio Ducking tool inside your editor. This instantly reduces the music track's volume to around -20dB the exact millisecond your narrator speaks, and raises it back up during pauses to keep momentum high.
To maintain face consistency across separate clips, avoid raw text-to-video processing. Instead, use an Image-to-Video baseline workflow. Generate a clean reference portrait of your character first using Midjourney. Then, load that static anchor image into your video generator (like Kling or Veo 3.1) alongside an Identity Lock or Reference element. This forces the AI to look at the source photo, ensuring your character looks the same in every shot.
Stick to the unshakeable 4-Step Production Sequence: First, render out your clean ElevenLabs speech audio track to set your timeline length. Second, generate your corresponding video scenes based on your image references to align with the vocal track. Third, layer in your ambient music track and turn on automatic ducking features. Finally, run the project through an automated caption module before exporting your polished 4K MP4 master file.
Ready to try AI Videos?
Transform your ideas into cinematic video in seconds.