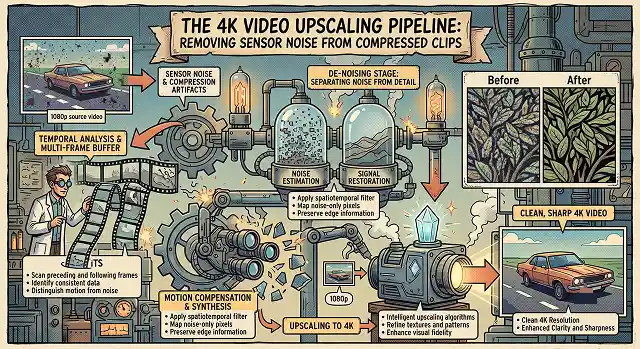
The process of upscaling a highly compressed and low-res video to a perfect 4K master is among the most difficult tasks that can be faced in post-production work. This problem does not have anything to do with the amount of information—rather, it has something to do with sensor noise.
In the case of a dark video scene or an older smartphone video that is compressed using contemporary technologies (such as H.264 and web videos), the encoder will pack sensor noise into compression blocks. Using raw AI to upscale this material will result in the latter taking these artifacts as actual content.
To fix this, professional colorists and visual effects (VFX) artists use a strict multi-stage reconstruction pipeline. Here's a practical, step-by-step breakdown of building an artifact-free 4K upscaling workflow.
The Hidden Mechanics: Denoise vs. De-Block
Understanding the exact nature of your video's defects determines how you build your pipeline. You are fighting two completely distinct digital limitations:
- Sensor Noise (Chroma & Luma): The physical limitation of your camera's digital sensor. In darkness, each individual pixel sensor may get overheated or detect minimal light signals, thus creating randomly-colored static (chroma noise) and varying sharpness (luma noise).
- Compression Artifacts (Macroblocking & Mosquito Noise): Compression tools such as H.264 format or very compressed files on the Internet reduce file size by compressing each group of eight pixels into flat blocks of the same colors. They also create "mosquito noise," an unusual ringing effect that occurs at edges and around high contrast areas.
- The Golden Rule: Never run an AI spatial upscaler over a video frame containing heavy macroblocking or raw sensor hiss. The network will scale the errors, baking them permanently into your final 4K geometry.
The Professional 4K Video Reconstruction Pipeline
To scale your compressed low-resolution sources cleanly, execute this production sequence inside an editing workstation or standalone suite (like Topaz Video AI, DaVinci Resolve Studio, or specialized ComfyUI setups):
Phase 1: Deep Ingest
- Import the compressed source clip into a 16-bit or 32-bit floating point workspace environment. This will ensure that even if your source file is an 8-bit, highly compressed web clip, the expanded canvas timeline depth allows the math engine to have enough numerical headroom to calculate the subtle gradients without introducing new color banding.
Phase 2 -Temporal Denoising
- Introduce a high-fidelity temporal denoiser (i. E., DaVinci Resolve's TNR or Topaz's Nyx model). Temporal filters compare multiple surrounding frames to track pixel continuity. If a pixel shifts erratically across 3 frames while the surrounding objects remain completely static, the algorithm identifies it as sensor noise and smooths it out without degrading textural sharpness.
Phase 3: Compression Artifact Smoothing
- Apply an auto-deblock algorithm (like Topaz Proteus or Iris tuned with manual sliders). Focus specifically on minimizing edge ringing and macroblock borders. Your objective here is to transform blocky geometric artifacts back into clean, smooth, continuous gradient paths.
Phase 4: Tensor Core Spatial Expansion
- After cleaning the canvas, start your first up scaler using spatial up scaler (for instance: Real-ESRGAN, BasicVSR++ or Topaz Artemis High Quality) and configure your desired output size to be 3840x2160 (True 4K). Since all the noise artifacts have already been deleted in the previous steps, your deep learning model will be completely free to focus solely on enhancing sharp outlines and real world detail.
Phase 5: Grain Addition & Lossless Export
- The results of the process described above can appear slightly artificial. Add a very subtle effect of grain emulation with monochromatic film grain (Size: 1.0, Strength: 1.5–3%). This will create more variation on the uniform areas of the picture and recreate the look of professional cinematic glass. Use a lossless editing codec such as Apple ProRes 422 HQ or ultra-high bit-rate H.265 container (60+ mbps) when exporting your masterpiece.
Tool & Model Stack Guide
Post-Production Ecosystems · Video Defect Mitigation Matrix
| Production Tool | Primary Pipeline Model | Target Action | Best Feature Benefit |
|---|---|---|---|
| Topaz Video AI | Nyx v3 | Pure Sensor Noise Removal | Industry-best restoration engine for dark, grainy shots. |
| Topaz Video AI | Proteus (Manual Adjust) | High-Compression De-blocking | Offers distinct control sliders for de-blocking, halo reduction, and sharpening. |
| DaVinci Resolve Studio | Advanced Temporal NR | Native Editing Timeline Denoise | Zero-round-trip timeline performance leverages GPU cores directly. |
| Video2X (Open Source) | BasicVSR++ | Motion-Consistent Upscaling | Open-source framework that uses multi-frame alignment to eliminate temporal flickering. |
Request A Custom AI Video
Tell us what you're trying to create and we'll point you to the right tool — or help you set it up.
1. Getting Into the Details: Spatial-Temporal Mathematics Behind Video Denoising
Existing video denoising methods utilize either spatial blurring (filtering of neighboring pixels) or temporal blurring (filtering of pixels between subsequent video frames). This old approach strips away micro-details like hair or fabric textures, resulting in a cheap "plastic skin" effect.
Modern production models—like Topaz Nyx v3 or open-source BasicVSR++ architectures—utilize an advanced concept known as Bidirectional Optical Flow with Second-Order Grid Propagation.
The AI does not look at frames in isolation. Instead, it uses a sub-network (like SPyNet) to calculate the movement of objects across a continuous buffer of 5 to 7 surrounding frames.
The algorithm recognizes this fluctuation of red and blue colors of the cluster of pixels as chroma sensor noise and removes it from the image. Due to tracking the motion vectors, AI is capable of removing strong grain without producing any artifacts and blur of the edges.
2. The Multi-Stage VRAM Processing Workflow
When low-resolution footage is highly compressed, the video container forces pixels into coarse $8\times8$ grid patterns called macroblocks. This blocky compression presents a severe problem for spatial upscalers like Real-ESRGAN, which often interpret these harsh square borders as actual environmental geometry, scaling the macroblocks into high-contrast digital artifacts.
To counter this, your rendering pipeline must enforce a strict Separation of Concerns inside your system's VRAM:
1. 16-Bit Floating Point Float Linearization
- Transform the original compressed video footage into an uncompressed 32-bit floating point or 16-bit half-floating point RGB linear color space in your program. The increased color resolution will provide the neural network with the precision necessary for the smooth gradient interpolation between macroblocks without any additional color banding.
2. De-Quantization & Multi-Frame Alignment
- Route the linear clip through a dedicated temporal artifact model (e.g., Topaz Nyx or UniFab Denoise AI) at its original native resolution (1× scale). By executing the complex spatial-temporal noise sweep before resizing the frame, you ensure the network handles pure sensor errors without getting confused by scaled pixels.
3. Tensor Core Super-Resolution Expansion
- Pass the cleaned, denoised 1× frames into your primary upscaling engine (e.g., Topaz Artemis or BasicVSR++) configured for a 4× scale factor. Since the input features are now smooth and clean, the model's tensor cores can focus entirely on reconstructing crisp outlines, high-frequency facial details, and authentic surface textures.
4. High-Bitrate Container Mastering
- Export your final 4K master video file using compression that guarantees quality intra-frame compression such as Apple ProRes 422 HQ or high bit-rate delivery compression such as H.265/AV1 at not less than 60Mbps. This restriction in terms of output encoding will guarantee that the 4K details of your film are not flattened by too much compression.
4K Reconstruction Pipeline
Decouple sensor grain, dissolve blocky macroblocks, and expand resolution without temporal artifacts.
The professional benchmark for offline restoration is Topaz Video AI, which features specialized spatial-temporal networks like Nyx, Proteus, and Astra. For enterprise real-time streaming pipelines requiring sub-30ms performance on ingest nodes, NVIDIA Maxine SDK dominates. If you need a fully cloud-driven browser workflow to avoid local GPU dependencies, Pixop and AVCLabs offer pristine node clusters, while Video2X remains the top open-source path.
This is the golden rule of video reconstruction. AI super-resolution models are trained to lock onto hard contrast variations, microtextures, and clear edge boundaries to reconstruct missing data. If you pass a noisy, pixelated clip straight into the upscale matrix, the AI will mistake random camera grain or compression squares for real image elements. The model will then faithfully "enhance" the noise, converting tiny pixel errors into massive, ugly 4K blocky artifacts.
They require entirely different treatment profiles. Sensor Noise is organic visual static (grain or colored speckles) caused by camera heat or high ISO values in low-light environments. Compression Artifacts are square blocks (macroblocking), color banding, and fuzzy halos caused by algorithms cutting data size to save storage. Clean pipelines target compression boxes first via de-blocking models (like Iris LQ) before dealing with raw pixel noise.
If an upscaler only evaluates frames one by one (spatial processing), the reconstructed pixels will shift position slightly every frame, causing a distracting shimmering or boiling look. A Temporal Denoising Pass evaluates multiple neighboring frames simultaneously, mapping moving objects across a timeline. This ensures pixels remain chronologically stable, keeping background details locked and smooth across fast camera movements.
It sounds counterintuitive, but it completely breaks the synthetic "AI look." Heavy noise reduction and upscaling matrices often leave flat color surfaces (like skies or human skin) looking unnaturally plastic and smooth. Injecting a tiny, controlled layer of uniform Digital Film Grain (around 15-20% volume) across the final 4K layout masks any underlying model smoothing, tying the textures together to look like high-end cinema film.
Never render your hard-earned 4K upscale straight into a highly compressed format like a low-bitrate MP4, or you will bake compression boxes right back into your new pixels. Always export using massive, intra-frame editing codecs like Apple ProRes 422 HQ or Avid DNxHR HQ. These intermediate architectures retain absolute color depth profiles and spatial details across your post-production timeline layout.
Adhere strictly to this secure 3-Step Processing Sequence: First, extract a brief 3-second test clip from your most heavily compressed, dark, or fast-moving shot. Second, run manual variable tests using a model like Proteus to isolate macroblock removal, temporal smoothing, and fine sharpness independently. Finally, layer in a micro-dose of film grain to keep gradients smooth, check your asset boundaries, and commit to the full high-bitrate ProRes master export.
Ready to try AI Videos?
Transform your ideas into cinematic video in seconds.