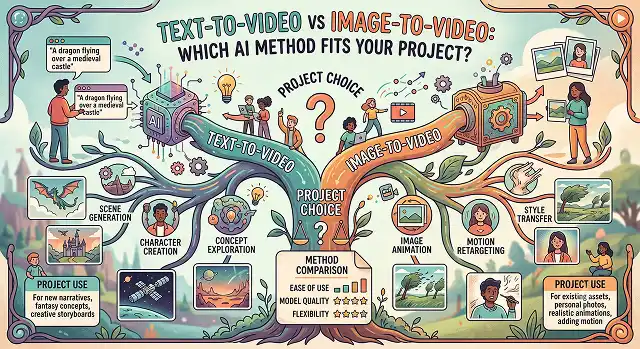
Generative AI videos have progressed from being a new technology demonstration to become the workshop of modern digital creation. However, right in the initial stage of your work on the project, you encounter an important choice – do you opt for Text-to-Video (T2V), or Image-to-Video (I2V)?
The vast majority of users consider this competition to be about who has the "better" technology. In reality, it is a question of architecture, starting constraints, and the type of control your project requires.
The Core Technical Difference
It is important to know how the underlying neural network works in order to use an appropriate method.
- Text-to-Video (T2V): The model uses its Diffusion Transformer (DiT) for creating everything from scratch. It parses your text tokens, extracts concepts, and hallucinates geometry, lighting, character continuity, and temporal motion simultaneously.
- Image-to-Video (I2V): The model's spatial layers are mathematically anchored by a reference photograph. The network maps the image’s physical depth and surface angles, meaning it only has to focus on computing time-based motion vectors.
When to Choose Text-to-Video
Text-to-video thrives on narrative and conceptual scale. If your project relies heavily on a script, voiceover track, or explicit lesson blueprint, T2V is your primary choice.
Top Use Cases:
- YouTube Without Faces & Education Explanatory Videos: Converting a 1,500-word blog post or course outline to a seamless video lecture.
- Concept Rapid Prototyping: Visual iteration of thousands of ideas during the early pre-production phase.
- Audio-Native Multimodal Content: Using models like Google Veo 3.1 or Sora 2 Pro, which automatically synthesize frame-accurate environmental sound effects and dialogue alongside the pixels.
- The T2V Verdict: Choose text-to-video when your project values information delivery and conceptual range over exact pixel-perfect consistency.
When to Choose Image-to-Video
There is no doubt that image-to-video should be used in case the branding identity, style, and total consistency are the top priorities.
Top Use Cases:
- E-commerce Product Demos: Turning a static, high-resolution photo of a watch, shoes, or any electronics into animation. Using a real photo guarantees no logo dissolves and product proportions don’t distort.
- Post-production Effects for Cinema: Applying professional tools such as Runway Gen-4.5 or Kling 3.0 featuring Motion Brush. It is possible to paint motion vectors over a certain element of the Midjourney/Photoshop artwork (e.g., running water or moving hair) and keep the other parts still.
- Social Media Teasers/Reels: Converting 2D graphic plates into a dynamic video format of 15 seconds long with a vertical orientation for mobile and 3D parallax camera.
- The I2V Verdict: Use image-to-video in case you require full control over frame composition and want your assets to be similar to your brand’s assets.
The Pro-Level "Hybrid Blueprint" Workflow
The most effective, scalable digital production pipelines do not pick one over the other. They layer both methods sequentially to eliminate visual rendering errors:
1. Concept Generation
- Draft your primary script narrative or visual layout goals. A text-to-image software such as Midjourney v7 or Flux can be used to create an extremely styled photo real master frame asset. The process of tweaking a still picture is much simpler than that of correcting a video clip.
2. Image Isolation
- Bring your clean image master into a photo editor. Fix any anatomical issues, clean up edge shapes, and save the asset in an uncompressed 16-bit PNG format to establish a strong structural baseline.
3. Motion Injection (I2V Phase)
- Upload your clean image into an I2V engine like Kling 3.0, Runway, or Wan 2.2. Inject a strict camera motion vector prompt (e.g., "slow cinematic dolly tracking shot along the negative Z-axis") to animate the static scene cleanly without texture drift.
4. Temporal Finish & Mastering
- Review the clip frame-by-frame. Crop the final 0.5 seconds if you notice minor end-of-step calculations starting to warp the edges. Pass the sequence through a temporal upscaling filter to output a clean 4K finish.
Stacking the Modalities Side-by-Side
Generation Modality Brief · Architectural Processing Matrix
| Operational Metric | Text-to-Video (T2V) | Image-to-Video (I2V) |
|---|---|---|
| Best Starting Asset | Scripts, detailed outlines, voiceover tracks. | Brand photos, vector logos, midjourney concept art. |
| Visual Consistency | Low to Moderate. Characters or backgrounds can experience minor shape shifts. | High. Colors, structures, and product design dimensions stay locked. |
| Creative Freedom | Infinite. Can generate impossible, surreal ideas out of text alone. | Restricted. Limited to the core layout rules of the source photo. |
| Rendering Speed | Slower (~2–5 mins per clip) as it builds data from scratch. | Faster (~1–2 mins per clip) because the visual foundation is pre-baked. |
| Ideal Project Length | Long-form content, educational courses, explainer lessons. | Short-form social media loops, cinematic ads, VFX inserts. |
Request A Custom AI Video
Tell us what you're trying to create and we'll point you to the right tool — or help you set it up.
Deep Dive: Cross-Attention Patch Mechanics
Both pipelines are based on a model named DiT (Diffusion Transformer). Rather than applying convolutions on pixels, the model divides the image canvas into patches (typically squares with sizes of 2 X 2 or 4 X 4 pixels).
[Raw Input Canvas] ➔ [Patch Partitioning Engine] ➔ [Flat Spacetime Tokens] ➔ [Positional Frame Embedding] ➔ [Cross-Attention Matrix]
- T2V Patch Generation: The spatial location of patches is determined entirely by how strongly the text tokens align with the spatial cross-attention layers. Because this mapping changes slightly with every calculation step, edges can drift out of place. This explains why an object in a T2V video might subtly grow, shrink, or shift shapes as the scene progresses.
- I2V Patch Masking: The network maps the starting patch locations directly from the source photo. The system locks down a high-precision Spatial Mask Layer. The network holds the low-frequency structural details (like large shapes, layout outlines, and background positions) completely solid, while allowing the high-frequency temporal layers to compute movement only where it's needed.
High-Performance Local ComfyUI Desktop Orchestration Workflow
If you want to run open-weight models locally without subscription boundaries, platform lines, or cloud queue delays, you can deploy the Wan 2.2 model stack.
1. Model Layer Ingestion
- Deploy the central UNETLoader node mapped directly to your local weights (e.g., wan2.2_t2v_14B_fp8.safetensors). Connect the CLIPLoader running the repackaged uMT5-XXL text processor along with a dedicated VAELoader directed to the wan_2.1_vae.safetensors model path.
2. Modality Routing Strategy
- For T2V workflows: Route an EmptyWanLatentVideo block directly into your sampler input.
- For I2V workflows: Add a Load Image node, scale your source photo to a clean 16:9 canvas size (1024 x 576), and pipe the pixels into a WanVAEEncode node to map the initial structural constraints.
3. Fine-Tune Sampler Parameter Weights
- Connect your processing paths to the unified KSampler node. To generate smooth cinematic motion, dial your parameters to: Steps: 25, CFG Scale: 5.5, Sampler: uni_pc, and Scheduler: simple. Paste this string into your negative text node: "warping backgrounds, digital artifacts, sudden cuts, flickering lights, low-res geometry".
4. 3D Causal VAE Decoding & Video Mastering
- Pass the computed latent blocks through the specialized WanVAEDecode node. The causal autoencoder translates the abstract mathematical values back into standard RGB frames, outputting a clean, unwatermarked WebM master file at 24 FPS.
Generation Engine Comparison
Analyze the trade-offs between rapid text concept mapping and image-anchored visual consistency pipelines.
It centers entirely on the **initial asset data source**. Text-to-Video builds everything from scratch using purely descriptive phrases; the AI generates the scenery, composition, character details, and physical movements at the same time. Image-to-Video uses a static photo as a permanent visual blueprint. The AI locks in the colors, faces, and lighting of the source file, focusing its computing entirely on adding smooth motion paths.
Image-to-Video wins decisively when it comes to visual control. In Text-to-Video, changing a single word in your prompt template can cause the AI to completely redraw faces, clothes, or environments between separate clips. Starting with a high-resolution base photo fixes character attributes in place. This lets you move the same subject across multiple scenes while keeping their identity identical.
Text-to-Video is perfect for rapid brainstorming, dynamic effects generation, and conceptual styling runs. If you need to cook up abstract visual layouts—like an explosive magical energy blast, a star collapsing, or unpredictable organic morphing paths—Text-to-Video allows the spatial model to shift pixels freely. This gives you high creative freedom without the structural limits of a source picture.
In Text-to-Video, your prompt text must explicitly cover everything: scene framing grids, clothing textures, environment objects, and lighting data profiles. In an Image-to-Video pipeline, you must drop all structural descriptors since the AI reads them directly from the reference file. Your prompt settings should focus strictly on camera trajectory and character actions (e.g., "slow dramatic push zoom forward, subject nods head smoothly").
For high-fidelity Image-to-Video animation, Kling AI 3.0 and Runway Gen-3 Alpha dominate the space, offering incredible parallax physics tracking and custom motion brushes. For text-driven cinematic scenes, OpenAI Sora, Google Veo 3.1, and Luma Dream Machine are the standard frameworks, providing spectacular complex spatial simulation grids and long-clip continuity controls.
Image-to-Video models typically render faster and consume fewer compute credits because the source image handles a massive chunk of the spatial mapping math. Text-to-Video architectures require the diffusion model to compute entirely new pixel frameworks from absolute zero data blocks, which means longer wait times in server queues and higher processing costs per scene run.
Deploy a professional Hybrid Master Pipeline: Start your project inside a static 2D image generator like Midjourney to craft high-resolution character concept sheets and asset layouts. Once you lock in a perfect reference look, export that image file. Finally, pass that reference block straight into an Image-to-Video engine like Kling AI to map out your kinetic camera movements. This workflow delivers elite cinematic results with absolute consistency.
Ready to try AI Videos?
Transform your ideas into cinematic video in seconds.