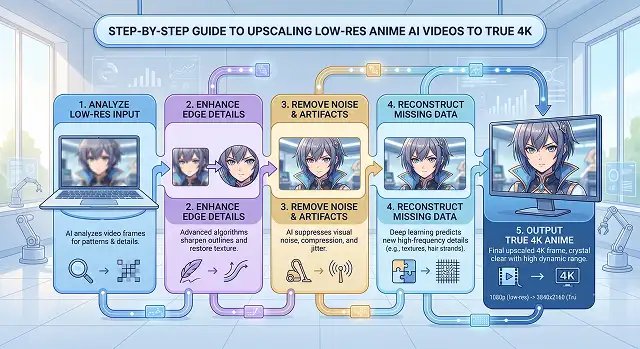
If you have ever created an anime animation using AI technology or downloaded a classic anime animation online, then you may know about the trouble: the video looks amazing on a small screen of your smartphone, but as soon as you try watching it on a bigger screen, it becomes distorted and low-quality.
AI video creators usually produce files in compressed resolution such as 720p or 1080p to speed things up during processing. It does not help much when you enlarge that file for use on a bigger screen because all the blurs will become even more visible.
There is a special method of increasing resolution for anime videos because while regular videos use such elements as skin texture and fabric, anime uses clear lines, flat colors, and gradients. Generic video upscaling can give you a plastic-like image or strange textures.
This guide walks you through the exact technical pipeline to cleanly reconstruct lines and colors, giving you true, crisp 4K anime video.
Step 1: The Step-by-Step 4K Anime Pipeline
To get a flawless finish without line bleeding or artifact glitches, run your video clips through this precise operational sequence:
1. Prepare Your Source Footage
- Use only the best-quality source material you have at hand. Inspect the clip for strong signs of compression (blocks of distorted colored pixels in smooth areas). Make sure any issues with face distortion or anatomical inaccuracies in your AI-generated clip are fixed before attempting to upscale them.
2. Choose an AI Model for Specialized Anime/CG
- Feed your clip into your preferred software (e.g., Topaz Video AI, LetsEnhance). Select models that include presets "Digital Art," "CG and Art," or "Anime/Waifu2x." They are specifically trained to enhance lines, but eliminate the compression noise in solid-colored areas.
3. Configure Resolution and Scale Limits
- Set your resolution target to 4K (which is 3840×2160 for standard 16:9 widescreen.) Push the manual sharpening slider all the way down into ‘basic’ (somewhere between 15%-25%.) Anime that is overly sharp has a jagged ‘robot” look to its lines – almost like a fine, sawtooth’ edge to thin lines.
4. Run a 5-Second Test Render
- Do not jump straight into rendering a full 5-minute video. Process a short 5-second preview first. Zoom in tightly on highly detailed areas—like character eyes, thin hair strands, and background gradients. If the lines look clean and the gradient shading is smooth, hit the final export button.
Step 2: Post-Upscale Polishing (The Editor's Edge)
Once your video drops out of the upscaler, it will look incredibly sharp, but the file size will be massive. Professional video editors run their fresh 4K files through a quick final editing block:
1. Re-Encoding and Compression
- AI upscaling video format itself can be quite unwieldy and difficult to interpret for social media platforms. Import your rendered file into a free application such as HandBrake. Re-encode the video in H.264 or H.265 (HEVC) formats, which will decrease your gigantic file size by about 70% without losing a single bit of your new 4K sharpness.
2. Gentle Color Grading
- There are times when an AI upscaled may completely “wash out” a color pallete or over saturate anime ones. Just pop into DaVinci Resolve,CapCut orPremiere Pro and drop your clip into it. Drop in an unsharpmask in to “lock” your line density at .5 on the radius and up the saturation on the clip 3-5%. The classic anime colors that you want pop!
The Best 2026 AI Anime Upscaling Environments
Line Sharpening Framework · Model Deployment Architecture
| Software Tier | Core Model / Tool | Primary Strengths | Best For |
|---|---|---|---|
| Open-Source (Free & Native) | Video2X (Frontend for Real-ESRGAN / Anime4K) | No cost, zero watermarks, and incredible frame-by-frame structural line sharpening. | Tech-savvy creators with strong local hardware or Google Colab instance access. |
| Premium Desktop (Pro) | UniFab Video AI (Kairo Model) | Dedicated "Kairo" model engineered specifically to prevent haloing and edge blur on cartoons. | Batch processing full episode seasons or massive video libraries overnight. |
| Cloud-Based (Fast Setup) | DomoAI / Topaz Cloud | Drag-and-drop web dashboard that runs heavy rendering computations on external servers. | Quick turnaround times on weak laptop hardware or lightweight setups. |
Request A Custom AI Video
Tell us what you're trying to create and we'll point you to the right tool — or help you set it up.
Step 3: The Step-by-Step 4K Reconstruction Pipeline
To scale up compressed vector geometries smoothly without introducing awkward flickering or digital "ringing" lines, execute this technical sequence:
To get a flawless finish without line bleeding or artifact glitches, run your video clips through this precise operational sequence:
1. Analyze and Clean the Source File
- Before loading files into your upscaler, review the raw video. If the source suffers from heavy, boxy block compression around the character edges, generic AI engines will accidentally lock onto those artifacts and amplify them. Clean the source or use a gentle, low-level denoise filter first to smooth out flat color blocks.
2. Deploy the Animation-Specific Model Layer
- Load your clean file into your chosen engine (like Video2X or UniFab). Manually bypass standard real-world models (like Iris or Proteus) and choose the model explicitly labeled Anime4K, Waifu2x, or Kairo. These algorithms prioritize tracking flat, contiguous color bounds over surface texturing.
3. Lock the Target Resolution and Scale Constraints
- Your last video config target will be 4K Ultra HD (3840x2160 with standard 16x9cinematic aspect ratio). Look for controls that say "Sharpening" or "Edge Enhancement." Go light on this; you will want a multiplier anywhere between about 15% and 25% -- go any higher than that, and the AI will develop jagged, almost "mechanical" edges on fine line work like hairs.
4. Execute a 3-Second Technical Test Render
- Do not commit your computer to a massive multi-hour render instantly. Isolate a high-action 3-second segment—ideally an anime fight scene or a complex camera zoom. Render only this snippet, open it, and zoom in to 100% to ensure lines are clean, gradients aren't noisy, and the mouth/eyes don't warp during movement.
Step 3: Mastering Post-Production and Audio Alignment
Raw upscaled outputs straight out of AI sandboxes are visually gorgeous but technically unoptimized. They create massive, uncompressed file containers that can cause platform video lag or audio desynchronization. Complete your render with these two vital polishing passes:
1. Fix the Audio-Desync Bug
A known issue across many open-source framework upscalers (like Video2X) is temporal frame drifting, where long files gradually speed up the video path while the audio track lags behind.
- The Pro Workaround: If upscaling content longer than 5 minutes, use an editor to split the low-res video into smaller, bite-sized 3-minute chapters. Upscale each chapter independently, then snap them back together along your master timeline.
2. High-Efficiency Re-Encoding (HandBrake Setup)
To keep your storage space safe and ensure your content complies seamlessly with Google AdSense video networks or streaming video guidelines, compress the massive upscaled output file:
- Import your original 4K upscale into Handbrake, a free video converter tool.
- The H.265 (HEVC) 10-bit video encoder profile.
- Set the Framerate option to "Peak Framerate" or "Constant Framerate" matching your source (typically 24fps or 30fps). This pass slashes your final file size by up to 75% without compromising your newly reconstructed 4K edge fidelity.
Anime 4K Upscale Guide
Preserve sharp line art and vibrant cell shading while pushing low-res clips to true 4K resolution.
Generic video upscalers are trained on photorealistic footage to predict complex organic textures like skin pores or grass. When applied to anime, they mistake flat color blocks and sharp ink lines for noise. This causes ugly smudging, texturing artifacts on solid colors, and fuzzy "halo ringing" along character borders. Anime requires models that explicitly respect 2D vectors and line-art preservation.
The top industry standard models are Kairo (via UniFab), Waifu2x, and Real-CUGAN. Kairo is highly optimized for modern digital cell shading. Waifu2x is the classic open-source algorithm designed to remove blocky compression noise from line art. Real-CUGAN acts as a hyper-precise repair engine that fixes color bleeding and line blur on highly compressed low-res exports.
Follow this secure 4-step routine: First, clean up your source clip by rendering out any flickering pixels or motion hallucinations. Second, import the timeline file into an anime-tuned software tool (like UniFab or Let's Enhance). Third, select a dedicated animation engine model and apply a "Medium" Denoise pass to target compression blocks. Finally, set your resolution scaling to a 4K output layer (3840x2160) and process.
Pixelation and blocky squares happen due to aggressive internet compression (JPEG/AVC artifacts). To clear them without losing structural snap, utilize an upscaler with an integrated Artifact De-blocking or De-noising slider (like Waifu2x-based pipelines). Setting this parameter to a moderate tier tells the network to dissolve edge noise first, paving a clean path for the secondary scaling matrix to rebuild uniform color blocks.
Base it completely on your raw clip length and machine specs. For quick 5-to-10 second social media edits or standalone scenes, cloud upscalers like Let's Enhance or DomoAI offer effortless, zero-setup speeds right inside your browser. But if you are compiling multi-minute edits or full narrative animations, local desktop applications (like UniFab or Video2X) are essential to prevent session timeouts and unlock full batch processing parameters.
Frame interpolation uses AI to generate missing frames between your existing cuts, raising an 12fps or 24fps video up to a silky-smooth 60fps. While this is fantastic for fast-paced action sequences, fight clips, or sweeping tracking panning, use it cautiously. Traditional anime relies on intentional frame stuttering for style; over-interpolating regular dialogue can create a weird, hyper-fluid "soap opera effect" that strips away the hand-drawn feel.
Perform a Zoom Check on the line work and gradients. Open your exported 4K render file, pause on a fast motion frame, and zoom into fine details like character eyes, loose hair strands, or soft background color gradients. If the line borders look perfectly solid with zero jagged pixel edges, and the background shadows change shades smoothly without step banding, your file is fully polished and ready for premium displays.
Ready to try AI Videos?
Transform your ideas into cinematic video in seconds.