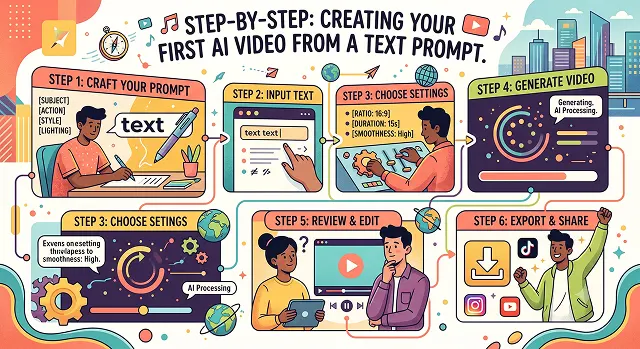
Creating your very first video from scratch based on a textual prompt is among the most exhilarating achievements of today’s era of content creation. It is due to the enormous technological advancements made possible through DiT architecture that now you no longer require sophisticated camera equipment, intricate editing, and 3D modeling expertise to materialize your concepts.
It only requires one carefully crafted sentence for multi-million-dollar cloud GPUs to render high-quality cinematic clips in just a few seconds.
Step 1: Memorize this “5-element prompt recipe.”
The majority of beginner AI users often screw up and put something really vague like this: “futuristic cool cityscape cinematic.” It makes the text encoder confused and gives you blurry backgrounds, anatomical distortion, and crazy frame jitter.
To get premium results, build your text prompts using the industry-standard Five-Element Formula:
Prompt Prompt = Subject + Environment + Core Action + Cinematography + Lighting Style
The Formula in Action:
- Subject: "An elderly sherpa with deep wrinkles and a kind smile, wearing a thick down parka..."
- Environment: "...standing at the wind-swept peak of Mount Everest, snow swirling sharply in the background..."
- Core Action: "...slowly turning his head to stare directly at the camera lens, squinting eyes..."
- Cinematography: "...shot using 35mm anamorphic lens, extreme close-up shot, slight steadycam motion..."
- Lighting: "...golden hour backlight with volumetric light rays coming through the fog, cinematic texture..."
Step 2: Calibrate Your Advanced Engine Settings
Before you hit the "Generate" button, look directly below the text box. Locate the advanced settings panel to lock down your formatting vectors. This prevents typical rendering artifacts:
- Aspect Ratio Selection: For videos going on YouTube or desktop website landing pages, make sure you choose the 16:9 Widescreen option. Otherwise, if you are making a video destined for the Short feeds, whether it be for TikTok, YouTube Shorts or Instagram Reels, select 9:16 Vertical.
- Motion Weights (CFG Guidance Scale): lower the CFG scale in the 3.5 to 5.0 range. Pushing this slider past 7 forces the engine to match your text letters too literally, causing harsh pixel color burn and geometric edge warping.
- Duration Selector: Start with a tight 4 to 5-second baseline. Shorter generations give the neural networks a tighter mathematical window, resulting in much higher physical consistency. You can chain extensions later once the core composition looks right.
Step 3: Execute the Render & Post-Production Finish
Once your parameters are dialed in, follow this operational sequence to finalize your master clip asset:
1. Initiate the Generation Queue
- Click Generate. The server grid will begin calculating the latent pixel variables. Do not refresh your browser page; the rendering queues operate on real-time webhook responses.
2. Frame-by-Frame QC Pass
- Open the completed render in full preview mode. Scan the final 24 frames of the clip closely. Because generative diffusion models occasionally experience mathematical drift near the tail end of calculation loops, use a timeline editor to snip off the final 0.5 seconds if you spot edge warping or texture melting.
3. Audio Layer Integration
- If using an audio-native engine like Veo 3.1, evaluate the automatically generated 48kHz sound effects layer. If using a silent engine (like Runway), drop a copyright-safe AI-generated atmospheric background music loop onto the track below your video timeline.
4. Temporal Resolution Upscale
- Export your clean, verified clip sequence. Pass the master through a dedicated temporal video AI upscaling node to scale the file from its base resolution up to a crisp 4K Ultra HD ($3840 \times 2160$) finish.
AI Video Workspace
Workspace Architect · Free Tier Framework Comparison
| AI Video Engine | Best Suited For | Top Feature | Free Tier Framework |
|---|---|---|---|
| Google Veo 3.1 / AI Studio | Cinematic Realism & Nature | Native Audio. Generates 48kHz synced sound grids alongside pixels. | Free tier quota via Google AI Studio ecosystem. |
| Kling AI (3.0) | Complex Human Anatomy | Motion Precision. Handles walking, expressions, and joint tracking flawlessly. | 66 free daily generation credits. |
| Seedance 2.0 | High-Volume Prototyping | Extreme Speed. Multi-model aggregator yielding clips in under 30 seconds. | 100 free daily tokens. |
| Runway Gen-4.5 | VFX & Directorial Art | Granular Control. Multi-Motion brush parameters for localized physics. | One-time 125 onboarding trial payload. |
Request A Custom AI Video
Tell us what you're trying to create and we'll point you to the right tool — or help you set it up.
Advanced Architecture: The Wan 2.2 / 2.1 Model Ecosystem
Alibaba's open-source suite stands as a monumental shift in video generation, deploying a specialized 3D Causal Variational Autoencoder (VAE) paired with a Diffusion Transformer (DiT) framework. Understanding the specific compute tiers allows you to manage VRAM allocation effectively:
- Wan 2.1-T2V-1.3B (Ultra-Accessible): This ultra-lightweight network is designed specifically for poor hardware performance. Using less than 10GB of VRAM (~8.19 GB minimum requirements), it operates on regular consumer laptops and GPU, producing excellent motion consistency 480p videos.
- Wan 2.1-T2V-14B (Cinematic Master): 14-billion parameter layer with impeccable. It natively supports full 720p HD processing, delivering complex lighting interactions and multi-subject physical consistency.
- Kijai GGUF Quants: For independent developers running single local GPUs (like an RTX 4090), the unquantized 14B model can trigger memory overhead crashes. Utilizing Kijai’s Q5_K_M or Q8 quantized GGUF models drastically reduces the footprint, allowing you to generate flawless 720p sequences locally without severe processing bottlenecks.
Advanced Prompt Mechanics: The Token Weight Matrix
The underlying text-parsing engine of frontier video models relies on a massive text encoder, such as the uMT5-XXL framework. The T5 encoder converts your natural language words into geometric tokens.
If your prompt features chaotic, contradictory phrasing, the cross-attention layers discard visual features, resulting in edge tearing and facial morphing. Build your token syntax around an explicit Axis-Aligned Vector Matrix:
- [Subject Core] ➔ [Environmental Lock] ➔ [Motion Path Vector] ➔ [Lens Blueprint] ➔ [Atmospheric State]
The Cinematic Production Script Blueprint:
- A silver-furred cybernetic wolf with pulsing blue LED circuitry accents along its spine, walking slow and deliberate across a rain-slicked concrete platform in a neon-drenched cyberpunk metropolis at night. The camera executes a slow cinematic dolly tracking shot moving perfectly along the negative Z-axis, creating sharp 3D parallax layers as background skyscrapers glide smoothly. Shot on a 35mm anamorphic lens, low-key dramatic volumetric lighting, soft orange and teal color grade, realistic mist dissipation, 4k cinematic film texture.
- Why this works: The phrasing anchors coordinates. Specifying Z-axis and parallax layers forces the 3D Causal VAE to lock down the background geometry across the temporal timeline, preventing the background from turning into fluid mush during the camera push.
Local ComfyUI Desktop Integration Pipeline
To break completely free from cloud subscription models, credit limitations, or hidden server lines, configure this precise professional text-to-video workflow within ComfyUI:
1. Model Layer Ingestion
- Deploy a standard UNETLoader node mapping to your target safetensors (e.g., wan2.1_t2v_14B_fp8.safetensors). Connect a CLIPLoader containing the heavy umt5_xxl text encoder along with a dedicated VAELoader set to the native wan_2.1_vae.safetensors model path.
2. Conditioning & Text Parsing
- Connect your CLIP loaders to a pair of CLIPTextEncode nodes. Paste your cinematic vector prompt into the positive node slot. In the negative node block, input this strict defensive array to suppress rendering anomalies: "morphing, digital artifacts, sudden cuts, flashing lighting shifts, warping backgrounds, low resolution, deformed anatomy."
3. Latent Resolution Configuration
- Deploy an EmptyWanLatentVideo or layout node. In order to meet the widescreen movie criteria, set the dimensions manually to 1280 x 720 pixels (720p HD). Choose the length of the target frame as 81 or 100 frames per second while maintaining a 24 FPS rate.
4. Sampler Execution & VAE Extraction
- Route parameters into a KSampler node. Set Steps: 25, CFG Scale: 5.5, Sampler: uni_pc, and Scheduler: simple. Pass the calculated latent tensor blocks through a WanVAEDecode node. This step processes the abstract numbers back into pristine visual arrays, compiling a clean, unwatermarked WebM or MP4 master file.
Text-to-Video Engine Primer
Master advanced script breakdown workflows, layout framing targets, and artifact-free rendering passes.
For creators launching their very first generation run, Luma Dream Machine and Kling AI offer the gentlest learning curves combined with spectacular base image coherence. If you need a completely automated pipeline that writes the script, organizes stock layouts, and builds an entire voiced timeline from a single sentence, InVideo AI and CapCut AI Video provide the fastest browser workspace engines. For high-end cinematic physics, platforms like Runway Gen-3 Alpha remain the industry standard headers.
If you dump a chaotic, unorganized story paragraph into a video generator, the AI will scramble different concepts together, causing character shapes to melt. Always deploy the locked structural recipe: [Core Subject] + [Environmental Setting] + [Camera Trajectory & Velocity] + [Lighting Profile] + [Stylization Specs]. Separating your descriptive boundaries this way allows the spatial transformer to process backgrounds clearly before drawing character movement paths.
Match your canvas framework directly to where your audience will watch the video asset. If you are constructing cinematic presentations, software documentation videos, or website hero components, select a traditional 16:9 widescreen layout. If your target destination is mobile short-form networks like TikTok, YouTube Shorts, or Instagram Reels, toggle your dashboard settings over to a vertical 9:16 aspect boundary box before generating files.
The motion velocity slider controls how much physical change happens between video frames. Setting motion parameters to maximum speeds forces the generator to take massive structural risks, which frequently tears limbs apart or distorts background lines. For your initial projects, keep your motion intensity slider set to a moderate level (between 4 and 6 out of 10) to maintain rock-solid visual consistency and smooth camera transitions.
Video diffusion networks parse phrases visually rather than understanding deep language rules. Avoid abstract concepts like "she feels exceptionally happy" or "an elegant corporate atmosphere," because the machine cannot translate non-physical concepts into specific pixel grids. Instead, **describe the literal, visible objects** that represent those concepts, such as: "Character smiling widely, bright ambient office lighting, clean glass partitions, soft focus background layout."
Almost all standard AI spatial transformers generate base video elements in short clips lasting exactly 4 to 5 seconds per scene run. If your target timeline script requires a longer uninterrupted window, utilize the platform's native **"Extend Video" tool**. This caches the final frame layout of your clip, treats it as a fresh reference baseline image, and renders an extra 4 seconds of logical motion pathing seamlessly.
Adhere strictly to this unshakeable 3-Step Creation Sequence: First, split your conceptual narrative script into individual, distinct scene descriptions using the locked structural formula layout. Second, run low-resolution draft previews across your scene blocks to check character stability and camera framing paths. Finally, lock your favorite clips, push them through a high-fidelity 4K upscaler block, and compile the final segments inside a timeline editor.
Ready to try AI Videos?
Transform your ideas into cinematic video in seconds.