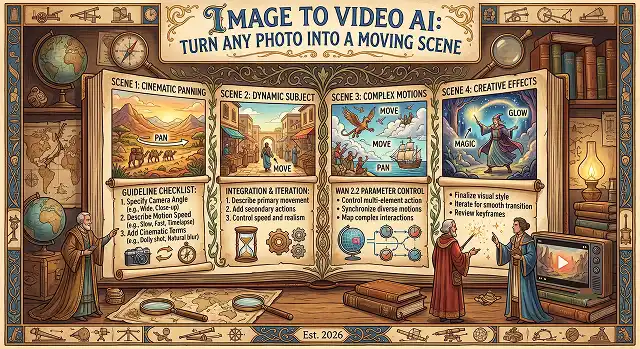
There's a specific kind of moment that happens the first time you watch a still photo start moving on its own — hair shifting in a breeze, water rippling, a face turning slightly toward the camera. It looks like it shouldn't be possible from a single flat image, and the first time I saw it, I genuinely rewatched it three or four times just to figure out what I was looking at.
That's image-to-video AI, and it's become one of the more practical entry points into AI video creation — mainly because you're not starting from nothing. You're starting from a photo you already have.
The Step-by-Step "Zero-Warp" Production Workflow
The primary obstacle in image-to-video generation is the "AI Melt"—where details like eyes glitch, straight edges bend, or objects deform. Follow this production blueprint to keep your animations stable and clean:
1. Asset Ingestion & Resolution Prep
- Upload your starting high-resolution source image (PNG or high-fidelity WebP format) into your selected generator workspace. Avoid uploading heavily compressed or low-light images, as the AI will mistake compression artifacts for real environmental details.
2. Apply the Directional Motion Prompt
- Do not just let the AI guess the motion path. Use a strict camera syntax explaining exactly how the camera moves relative to the subject.
- Weak Prompt: "Make this car drive."
- Strong Prompt: "Cinematic slow tracking shot along the negative Z-axis, dolly forward camera movement, vehicle wheels spinning realistically as the car drives forward."
3. Calibrate Motion Strength Parameters
- Locate the Motion Strength or Guidance Scale slider inside your settings menu. For maximum realism and zero spatial drifting, dial the slider down into the mid-range (value 3 to 5). Pushing this parameter too high forces the model to aggressively hallucinate data frames, leading to structural glitches.
4. Execute Render & Temporal Finish
- Initiate the generation loop. Review the final 4-to-6 second output master frame-by-frame. Once verified clean, bring the clip into your favorite editor to clip out the final second if the AI begins to drift or stretch the edges.
Pro-Level Styling Strategies for Ultimate Realism
To push past generic text-to-video approximations and capture genuine cinematic physics, use these deep platform features:
- The Multi-Motion Brush Mapping (Runway/Krea): When animating a landscape, you rarely want the entire mountainside to slide around. Use the localized motion brush tool to mask only the specific regions you want to move—such as drawing path vectors solely across a river current or a character's blowing hair—while leaving the rest of the environmental geometry perfectly locked.
- First/Last Frame Bridging (getimg.ai/Pika): If your scene requires a complex narrative arc, use models that support uploading both a starting image and an ending image. The AI will calculate the ideal physical path to transition the first frame smoothly into the second frame, giving you director-level timeline pacing control.
- Inject Audio-Native Foley Loops: A moving visual asset is incomplete without structural acoustics. Pair your finished video master with an AI audio companion (like Google Veo 3's native multimodal audio pass) to synthesize scene-aware footsteps, environmental wind hums, or deep mechanical soundscapes that match the movement with frame-accurate precision.
Image-to-Video AI Engine Stack
Physical Simulation Models · Platform Allocation Metrics
| AI Video Engine | Best Suited For | Top Feature | Free Tier Allowance |
|---|---|---|---|
| Kling AI (v3.0) | Character and Product Consistency | Identity Lock. Keeps human faces and product logos from warping. | 66 free credits daily (~6 standard clips) |
| Luma Dream Machine | Architectural Renders & Landscapes | Cinematic Camera Physics. Flawless pans, tilts, and complex tracking. | 30 free video generations per month. |
| HaiLuo AI (MiniMax) | Rapid Prototyping & High Speed | Zero-Watermark Free Export. Completely clean web delivery rendering. | ~5–10 free standard quality clips per day. |
| Runway Gen-4 / 4.5 | High-End Film Work & VFX | Multi-Motion Brush. Paint precise localized motion paths over your asset. | One-time trial token payload upon initial registration. |
| getimg.ai | Multi-Model Testing & Orchestration | Unified Dashboard. Switch between Veo 3, Kling, Wan, and Sora 2 instantly. | Rolling free credits for sandbox testing parameters. |
Request A Custom AI Video
Tell us what you're trying to create and we'll point you to the right tool — or help you set it up.
Deep Dive: Open-Source Zero Watermarks
Whereas many web platforms have restrictions on free accounts or even have watermarking policies, using open-source architectures allows for total creative control, unlimited rendering capabilities, and complete data privacy.
Open-source development uses two main architectures for local use cases:
1. Stable Video Diffusion (SVD-XT)
Developed by Stability AI, SVD remains a core choice for local pipelines. The SVD-XT architecture expands the base model from 14 frames to 25 frames, allowing for longer, more stable motion segments.
- The Latent Space: It operates within a compressed latent space using an underlying UNet structure conditioned on image tokens.
- Hardware Requirement: Runs comfortably on local setups with a minimum of 12GB VRAM using FP16 quantization protocols.
2. Wan 2.2 I2V (14B parameter variant)
Alibaba's open-source model uses a highly scalable Mixture-of-Experts (MoE) and Diffusion Transformer (DiT) baseline.
- The Latent Space: Rather than using conventional spatial UNet architecture, Wan 2.2 considers both time and spatial dimensions in equal measure as continuous tokens via 3D Causal VAE architecture.
- Hardware Requirement: 14B version of the model is extremely compute-intensive and hence requires RTX 3090/4090 (24 GB VRAM) hardware to be used locally with INT8/FP8 precision layers.
Setting Up a Local ComfyUI I2V Execution Pipeline
To run unwatermarked image-to-video processing locally without cloud token restrictions, build this explicit node network inside ComfyUI:
Node 1: Load Image & Pre-Processing Scaling
- Deploy a standard Load Image node. Feed your source photo to an Image scaling node to have you target resolution capped to be fixed exactly to $1024 \times 576$ (16:9 widescreen). Forcing the canvas dimensions to match the exact training matrix of the model prevents edge stretching.
Node 2: SVD / Wan Model Loader & Conditioning Inputs
- Load your target checkpoints via the ImageOnlyCheckpointLoader node. Connect the model outputs to a Positive Conditioning block. Paste a precise vector prompt describing the camera movement (e.g., "slow cinematic dolly forward tracking shot along the Z-axis").
Node 3: Latent Space Encoding & Motion Vector Adjustments
- Route your pre-scaled source image into the VAEEncodeForInpaint node. Connect the structural outputs to the KSampler input. Set your generation properties manually: Steps: 25, CFG Scale: 3.5, Sampler: dpmpp_2m, and Scheduler: karras.
4Node 4: 3D Causal VAEDecode & Video Linearization
- Pass the computed latent blocks through the specialized VAEDecode (Video) node. This translates the raw tensors back into standard RGB frames. Route the finalized frame string into a VHS Video Combine node to compile a clean, uncompressed WebM master file at 24 FPS.
Image-to-Video Engine
Animate static snapshots, establish camera trajectory grids, and unlock fluid parallax motion pipelines.
The top platforms dominating the image animation space are Kling AI 3.0 and Runway Gen-3 Alpha (the industry leaders for lifelike character movement and physical physics tracking). For hyper-realistic camera panning sweeps and sweeping landscape animation, Luma Dream Machine provides phenomenal depth. If you prefer open-source architectures to run locally on your own hardware network, Wan 2.2 delivers exceptional structural stability.
Text-to-video engines force the AI to dream up both the composition character detail and the motion velocity simultaneously, which frequently causes visual hallucinations or shape warping. Starting with a source image anchor locks down your visual assets completely—including color grading palettes, character details, and exact lighting setups. This leaves the model's compute engine free to focus entirely on rendering smooth, lifelike kinetic paths.
When using an Image-to-Video pipeline, completely drop all visual labels, color descriptors, and wardrobe details—the AI can already see them in the file. **Focus your text parameters exclusively on camera dynamics and character velocity**. A rock-solid formula is: [Subject Action] + [Environmental Dynamics] + [Camera Trajectory preset]. For example: "Character smiles gently, hair blowing softly in wind, cinematic slow tracking camera pan push forward."
These are specialized interface layout controllers designed to give you precise spatial direction. A Motion Brush lets you highlight a specific zone of a photo (like a waterfall or campfire) and draw a directional arrow, instructing the AI to animate *only* that isolated space while keeping the rest of the canvas locked still. A **Camera Control Grid** features precision input nodes to dictate explicit panning, dollying, zooming, or rolling coordinates.
Spatial distortion happens when you force extreme camera movement tracking values inside the generation dashboard settings. Pushing motion settings up to high-speed thresholds forces the neural engine to completely guess what lies hidden off-canvas, which causes background structures to morph unnaturally. To preserve layout safety, keep your movement velocity slider set to a moderate level (around 3 to 5 out of 10) to establish smooth, artifact-free parallax tracking loops.
Yes, using a specialized post-production feature known as Video Extension or Frame Caching loops. Platforms like Kling and Runway feature an "Extend" workflow button right on your project dashboard. The engine locks in the final frame of your generated video asset, treats it as a fresh image reference node, and parses an additional 4 to 5 seconds of logical motion pathing onto the timeline, letting you scale scene durations fluidly.
Follow the professional 3-Step Pipeline Sequence: First, generate a pristine, high-resolution original image using Midjourney to lock in your subject details. Second, load the static asset file into a specialized motion engine like Kling AI, configuring your text prompts to focus strictly on movement trajectory while keeping velocity metrics moderate. Finally, review your rendering outputs for layout consistency before committing rendering processing runtime to full 4K upscaler transformations.
Ready to try AI Videos?
Transform your ideas into cinematic video in seconds.