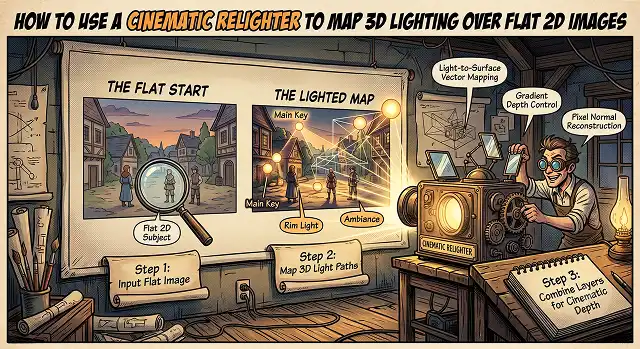
Flat lighting is the biggest buzzkill for photographers, digital artists, and people working on e-commerce. A well-composed picture can quickly turn into a bland one that would appear to have been taken in a dull office light.
Before, there was no other way around this problem but to get back to work on your 3D model, create a matching 3D mesh, texture map it and render everything anew.
Today, Cinematic Relighters change everything. By leveraging advanced computer vision, these AI-driven nodes analyze a flat 2D image, calculate its hidden spatial geometry, and project fully dynamic 3D light sources over it in real time.
The Core Concept: How Can a 2D Image Hold 3D Light?
A cinematic relighter does not just paint highlights over your image like a standard brightness brush. On the other hand, it creates a 3D Scene Reconstruction with two essential hidden layers:
- Depth Maps: The algorithm computes the actual distance from the lens to your subject and then to the background objects. This determines what is in front and what is behind the lens.
- Surface Normals: The algorithm computes the precise degree of curvature of all pixels (like the curvature of a cheek bone, the folds of a dress, and the edges of a product packaging).
Once this spatial map has been computed, you can put a “Point Light” or “Spotlight” in the scene. The software accurately wraps virtual rays around the subject, generating realistic specular highlights and shadow drops.
Step-by-Step Production Workflow to Relight an Image
Whether you are using a dedicated professional compositing node (like Nuke’s Relight node) or an intuitive real-time web interface (like Clipdrop Relight, GoStudio.ai, or Higgsfield Cinema Studio), follow this precise sequence to map your lighting:
1. Upload & Spatial Scan
- Import your high-resolution 2D image into the relighting engine. Allow the system to analyze the frame. If you are working in a professional node pipeline like Nuke, attach a Shuffle node to channel your pre-generated Normal and Point Position passes into the Color input.
2. Establish the Ambient Base
- Before adding dramatic spotlights, lower the global Ambient Light slider. Ambient light dictates the default shadow depth of the scene. Lowering it creates a dark canvas, giving your new 3D lights maximum contrast and pop.
3. Position the Virtual 3D Lights
- Place your light sources into the interactive 3D view space. Place a bright Key Light source off to the side to define the structure of the face, place the Fill Light on the other side to help with the definition of shadow, and add a bright Rim Light behind the subject.
4. Light Intensity and Color Temperature Settings
- Tweak light position and size of light beams. Choose your desired color temperature in Kelvin; map warm amber tones to create a natural outdoor sunset environment, cool blue or magenta for cyberpunk lighting, or white (5500K) for a clean e-commerce product setting.
5. Composite & Export
- Review the edges of your shadows to ensure they roll off naturally without pixelated noise. If using a professional suite, set a Merge node operation to Multiply, connecting your relighted pass to the original image to blend the synthetic illumination smoothly into the source textures.
The Four-Element Relighting Framework
Physical Render Attributes · Preset Configuration Strategy
| Lighting Attribute | What It Controls | Pro-Preset Configuration |
|---|---|---|
| Light Position | The angle, height, and physical coordinates of the light source. | Keep side lights at a 45-degree angle to maximize three-dimensional depth. |
| Beam Softness (Falloff) | Controls the transition edge between bright light and dark shadow. | Use Soft/Diffused settings for portraits; use Hard settings for structural metal or dramatic noir. |
| Specular Intensity | The amount of sharp, reflective "glare" bouncing off wet or shiny surfaces. | Cap this low on skin textures to prevent a sweaty, oily appearance. |
| Volumetric Depth | Simulates how light scatters through ambient atmosphere, fog, or dust. | Inject a 10-15% Haze factor to give light beams a physical weight in the room. |
Request A Custom AI Video
Tell us what you're trying to create and we'll point you to the right tool — or help you set it up.
The Core Lineages of AI Relighting Architecture
AI image relighting has split into two distinct technical methodologies. Choosing the right pipeline changes your computing footprint and your control layout:
1. Pseudo-Light Placement (Geometry-Based Architecture)
Tools in this category (like Clipdrop Relight, Higgsfield Cinema Studio, and Evoto) work strictly with computer vision. The AI estimates mathematical representations of the 2D scene space:
- Depth Map (Z-buffer): Associates a distance value in greyscale for each pixel, from the front layer all the way to the back layer.
- The Normal Map (XYZ Coordinates): Stores directly 3D vectors($x, y$and$z$) corresponding to surface angles into 3 colour channels(R, G and B).
- [2D Image] ➔ [AI Depth & Normal Extractor] ➔ [Interactive 3D Viewport] ➔ [Vector Light Calculation]
- Why it matters: The importance lies in the fact that it works just like a regular 3D rendering software. Moving a virtual light recalculates mathematical vector equations over the pixels, generating true light falloff based on surface distance.
2. Diffusion-Conditioned Latent Relighting (Generative Architecture)
Tools like IC-Light (integrated via ComfyUI or Stable Diffusion Web UIs) bypass geometric maps entirely.
- Latent Flow: The initial image is encoded into the compressed latent space through the use of the Variational Autoencoder (VAE).
- The Conditioning: The model is supplied with text prompt input (for instance, “dramatic neon studio lighting from the left”) or a targeted background image. It draws upon its massive training datasets to hallucinate how light naturally bounces, casting complex ambient reflections that geometry engines can miss.
The Physics of Relighting: Micro-Surface Interactions
To make a flat image look truly cinematic, the AI must calculate light interactions according to two core rendering principles:
1. The Lambertian Reflection Equation
IFor matte surfaces like plain cotton clothing or dry skin, the diffuse reflection calculation follows Lambert's Cosine Law:
ID = IL . kd . (N . L)
- Where $I_D$ is the final diffuse pixel intensity.
- Where $\mathbf{N}$ is the extracted Surface Normal vector of that pixel.
- Where $\mathbf{L}$ is the normalized directional vector pointing directly to the virtual light source.
If the angle between the light and the surface plane widens, the dot product drops, causing the light to fall away smoothly into deep shadows.
2. Specular Highlights and Interactions with Glossy Materials
In the case of lighting being applied to glossy or high frequency material surfaces (such as the eye’s cornea, moistened lips, sweat or metal surfaces), the system switches to the following microfacet distributions:
IS = IL . ks . (N . H)^n
- Where H represents the Halfway vector between the camera view and the light direction.
- Where n is the material glossiness exponent factor.
Adjusting the Specular Intensity slider modifies this exponent value. Lowering it softens hot spots across the image, while raising it tightens reflection paths, making surfaces look polished or metallic.
Step-by-Step Local ComfyUI Workflow (IC-Light Pipeline)
If you are running IC-Light locally inside ComfyUI to achieve total control over your lighting passes, execute this exact structural node layout:
1. Load Foreground Image
- Deploy a standard Load Image node. Pass your flat, transparency-masked 2D subject image into the network pipeline.
2. Inject the Background Environment Map
- Use a separate Load Image node to input your target environment or background plate. Route this through a VAE Encode node to convert the pixels into a latent structure.
3. Route to the IC-Light Apply Node
- Load the specialized IC-Light Model check-point. Connect the model, foreground latent mask, and background latent tokens into the unified Apply IC-Light execution node.
4. Apply the Lighting Text Guidance
- Connect a CLIP Text Encode node. Type your precise directional lighting properties (e.g., "volumetric rim light, warm soft studio key illumination, 4k texture fidelity") to dictate the final look.
5. Execute KSampler & VAE Decode
- Pass the combined system states into a standard KSampler node. Set steps to 25–30, sampler to dpmpp_2m, and scheduler to karras. Route the resulting latent data through a VAE Decode node to output your finalized, high-fidelity relit image.
Cinematic Relighting Engine
Map advanced studio illumination, wrap volumetric highlights, and cast deep geometric shadows over flat graphics.
The top specialized engines include Higgsfield AI (Cinema Studio / Relight) (the leading standard for multi-angle studio control grids) and Krea AI (Lighting Editor) (exceptional for rapid web composition and canvas brush control). If you require an advanced local desktop framework without cloud credit gates or privacy concerns, running the open-source IC-Light (Imposing Consistent Light) architecture via ComfyUI or WebUI provides absolute pixel mastery.
The software utilizes a specialized machine-learning algorithm called a Surface Normal Estimator. When you upload your file, the neural network calculates the structural depth of the subject—identifying the exact curvature of the nose, cheeks, clothes wrinkles, or product ridges. It generates a hidden 3D mesh map over those flat points, allowing virtual lamps to calculate physically correct illumination bounce and angle drop-offs.
This toggle defines the scale and texture of your virtual light source. Soft Mode simulates a massive, diffused studio softbox or overcast daylight. It wraps illumination gently around edges, smoothing out skin pores and casting blurry, gradual shadow gradients. Hard Mode replicates a tiny, concentrated light beam—like direct mid-day sunlight or a harsh raw spotlight. This forces ultra-sharp, high-contrast shadow lines and heavy specular reflections.
Instead of guessing color names, utilize precision inputs. To seamlessly match a subject cutout onto a warm sunset backdrop landscape, input an amber hex profile (like #FFB060) or command a warm 3200K tungsten rating. If your background features a cold night scene or corporate display terminal, dial your selector pad over to a pale teal hue (#D0E8FF) or a crisp 6500K daylight value to align the lighting ambient values perfectly.
A rim light is a professional lighting position placed directly behind the subject. In your relighting workspace interface, click the Back or Rear preset button, or drag the manual 3D directional light cone vector completely toward the top-outer rim boundary of the asset tracker hemisphere. This instructs the pixel generator to paint a brilliant glowing border trace along your character's hair, shoulders, and outer silhouette, separating them sharply from dark backdrops.
Visual artifacts or warping occur when the original image contains chaotic clutter or harsh predefined shadows that confuse the depth map calculations. To guarantee clean extractions, start by uploading a neutrally lit, flat-diffused original image. If the engine outputs slightly fuzzy edge data, open your configuration advanced dashboard and reduce the "Denoise / Structure Strength" values while slightly bumping up the overall scene contrast parameters.
Adhere strictly to this secure 3-Step Compositing Routine: First, upload your isolated subject portrait into the relighting system workspace. Second, analyze your planned background backdrop to match its directional axes, soft/hard properties, and explicit color hex profiles precisely onto your target light controls. Finally, hit generate to receive your newly illuminated asset layer, and blend it over your target environment scene using a clean overlay layer mix.
Ready to try AI Videos?
Transform your ideas into cinematic video in seconds.