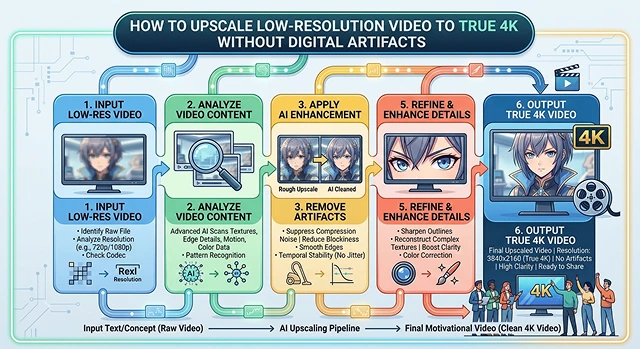
Most of us have some video sitting around that deserves better than its original resolution — a camcorder tape from 2004, a phone video shot in low light, a DVD rip, or a clip you downloaded off the internet at 480p. Simply stretching those pixels bigger just makes them blockier and fuzzier.
AI-based upscaling handles this differently. Instead of just enlarging pixels, models trained on real footage reconstruct plausible detail — sharper edges, cleaner skin tones, recovered texture — that was never actually captured on the original recording.
Push the settings too hard, though, and you get the opposite problem: waxy skin, flickering detail, and edges that look computer-generated rather than restored. Here's a practical, no-nonsense guide on how to upscale real-world, low-quality footage to a clean 4K without those artifacts.
What Actually Goes Wrong With Old or Compressed Footage
Camcorder tapes, old phone clips, and downloaded videos each bring their own baggage into the upscaling process. Know what you're dealing with before you touch any settings:
- Interlacing Combing: Old camcorder and DVD sources are often interlaced. Upscale that without deinterlacing first and you'll bake in permanent jagged, comb-like lines on any motion.
- Compression Blocking: Downloaded or re-compressed clips (old YouTube uploads, WhatsApp-forwarded videos) are full of 8×8 pixel blocks from heavy compression. An upscaler that doesn't know better will "sharpen" these blocks instead of removing them.
- Waxy / Plastic Skin: Push denoising too aggressively on a grainy old phone video and skin loses its natural texture, turning smooth and rubbery instead.
The Best Restoration Tools For Real Footage
Achieving a clean render depends entirely on picking the right tool and model for your specific footage type.
Industry-Standard Desktop Engines
- Topaz Video AI / Astra: The go-to for offline restoration of real footage. Its Iris model is specifically tuned for low-resolution faces from old cameras, and Proteus gives you deep manual slider control for tricky, grainy sources.
- UniFab Video Upscaler AI: A strong combination of speed and quality, with models like Equinox (general-purpose) and Vellum (great for texture-rich landscapes and outdoor home videos).
Open-Source Option (Completely Free)
- Video2X: A solid free option that runs Real-ESRGAN (good for live-action detail recovery) and BasicVSR++ (keeps motion consistent across frames, which matters a lot for shaky old handheld footage).
Step-by-Step: Restoring Old Footage to 4K
Follow this sequence for camcorder tapes, phone videos, or any other low-quality real-world source:
1. Ingest & Deinterlace
- Import your camera original or highest-quality source file. If you're working with old home videos or DVD rips, apply a deinterlacing filter (like QTGMC) first — upscaling interlaced lines directly bakes in permanent jagged edges.
2. Denoise Before You Upscale
- Don't let the upscaler treat film grain or sensor noise as real detail — it'll turn it into weird digital static. Run a proper denoise pass first, using something like Topaz Nyx or DaVinci Resolve's noise reduction.
3. Scale In Stages, Not All At Once
- Don't be overly aggressive. Jumping straight from 480p to 4K is a 9x pixel increase that often produces a waxy look. If your source is very low resolution, upscale to 1080p first, check the result, then do the final jump to 4K.
4. Final Master Export
- Once you have a clean result, export via a high-quality codec such as ProRes 422 HQ or H.265 at 40+ Mbps so the newly restored 4K detail doesn't get squashed by regular video compression.
The AI Video Upscaling & Artifact Prevention Matrix
Model Tuning Optimization · Render Safeguard Configuration
| Tool / Platform | Best-Suited Model | Ideal Footage Type | Target Settings to Prevent Artifacts |
|---|---|---|---|
| Topaz Video AI | Proteus | General Live-Action & B-Roll | Sharpening: 15-25; Reduce Noise: 10-20 to keep natural texture. |
| Topaz Video AI | Iris / Iris MQ | Interviews & Talking Heads | Use Iris MQ for heavily compressed low-quality media sources. |
| Topaz Video AI | Gaia | High-Quality Sources / CGI | Run a separate denoise pass prior to upscaling. |
| UniFab AI | Equinox / Vellum | Rapid Content Creation | Use default presets but keep target bitrate above 40 Mbps. |
| Video2X (Open Source) | Real-ESRGAN | Real-World & Cinematic Textures | Limit to 2× scale factor; allocate GPU threads properly. |
| Video2X (Open Source) | BasicVSR++ | High-Motion Sports & Action | Process video in 1-minute chunks to avoid audio sync drift. |
Request A Custom AI Video
Tell us what you're trying to create and we'll point you to the right tool — or help you set it up.
Pro-Settings Blueprint: Eliminating the "AI Look"
If you are using manual adjustment models like Proteus, dial back the default automated settings to achieve a natural, cinematic texture:
- Reverse Blur / Sharpen: Adjust the sharpening tool very carefully (in range 15-25). Over-sharpening is the reason for sharp edges.
- Add Film Grain Emulation: In order to remove any waxy or plastic surfaces that remain on skin texture, add small amounts of film grain emulation (ISO 100 - 200, size 1.0). A subtle organic grain layer masks minor AI calculation drifts and tricks the human eye into perceiving deeper detail.
- Lower the "Reduce Noise" Slider: If the video looks cartoonish, pull the noise reduction strength down below 50%. Allowing a tiny fraction of the original video noise to pass through preserves structural realism.
A Quick Recap
Getting a clean 4K upscale without artifacts comes down to a few things: start with the least-compressed source you can find, use a model built for video rather than single images, and resist the urge to max out sharpening and noise reduction. A little grain and a little restraint go a long way toward keeping the result looking like video instead of a plastic AI render.
Artifact-Free 4K Upscaling
Reconstruct missing spatial data cleanly using advanced machine-learning video pipelines.
The top specialized upscaling tools include Topaz Video AI (the professional benchmark for offline cinematic restoration), UniFab Video Upscaler AI (offers powerful content-specific models with a one-time perpetual license), and Aiarty Video Enhancer (highly praised for delivering an optimal balance of processing speed and detail recovery). If you need a fully cloud-based, server-side pipeline that doesn't tie up a physical graphics card, VanceAI Video Upscaler and Pixop are the standard choices.
Traditional hardware upscaling uses mathematical algorithms to stretch existing pixels and average out the empty gaps. This approach creates zero new details, resulting in a fuzzy, soft, and pixelated canvas when blown up to 4K resolutions. Advanced AI Super-Resolution uses trained neural networks to evaluate frames contextually, drawing entirely new high-frequency details like individual hair strands, skin textures, and crisp vector lines that look completely organic.
Waxy or cartoonish skin happens when an upscaling engine applies excessive noise reduction parameters. The AI misinterprets natural film grain or skin texture as blocky video compression noise and completely flattens it out before scaling the image. To fix this, switch your workspace configuration to a model with manual sliders (like Proteus in Topaz) and dial down the noise reduction filter while raising the "Recover Original Detail" parameter.
Unlike static images, video frames are linked chronologically. If an upscaler evaluates each clip page completely independently (single-frame processing), the AI will place fine details slightly differently on every frame. When played at normal speeds, this causes a distracting boiling, shimmering, or flickering artifact. Ensuring high quality requires a model with robust Temporal Consistency (like BasicVSR++ or Titanus) that tracks multi-frame motion paths to keep details locked fluidly across time vectors.
Yes, avoid being too greedy with the scaling coefficient. Pushing a heavily compressed 360p or 480p file directly up to a massive 4K output requires a 9x to 12x pixel jump, forcing the neural network to completely fake a massive percentage of the frame data. This almost always collapses into an abstract, synthetic look. A highly reliable engineering guideline is to restrict your upscaling run to a maximum step factor of 2x or 4x scaling from the original source profile.
Running complex spatial transformers locally demands severe desktop horsepower to prevent system freezes or multi-day processing times. Professional suites like Topaz and UniFab recommend a baseline floor of 16GB system RAM, 8GB dedicated VRAM, and a processing card optimized for machine learning computation tensors (such as an NVIDIA RTX 30-series or Apple Silicon platform). Without a dedicated GPU layer, look toward browser cloud processing nodes.
Stick strictly to this secure 3-Step Validation Routine: First, isolate a short 3-second test clip from your most active, motion-heavy scene. Second, run this sample through your chosen engine to adjust noise reduction balance, fine-detail sharpness, and compression correction parameters independently. Finally, review the output frame geometry under extreme zoom magnification before processing the full file into an uncompressed master format like ProRes or DNxHR.
Ready to try AI Videos?
Transform your ideas into cinematic video in seconds.