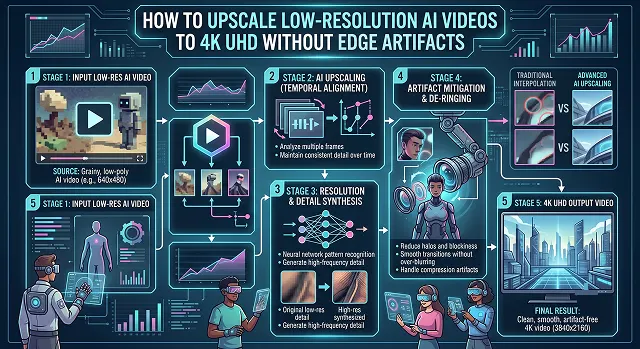
In the process of upscaling low resolution video into 4K UHD ($3840 \times 2160$) format, the classical algorithmic technique leads to a significant visual issue known as edge artifacts. The conventional method for sharpening stretches the pixels and results in very sharp white edges, pixelated blocks, or waxy skin effect.
Modern AI upscaling shifts the computation out of simple pixel multiplication and into neural geometric reconstruction. Rather than enlarging the borders, the AI interprets the underlying spatial lines and generates pristine structural outlines out of thin air.
1. The Anatomy of Edge Artifacts: Why Basic Scales Fail
To eliminate video distortion, you must understand the explicit errors that neural networks create when pushed beyond their limits:
- Haloing (Gibbs Effect): White rings around dark objects such as silhouettes, branches, or text layers. This is caused by the AI program trying hard to make a line very crisp, which makes the adjacent pixels over-adjust and go to white.
- Edge Ringing & Combing: Jagged, stair-step pixel patterns visible along diagonal lines. If you compress a compressed video source it’s always more common to experience problems when scaling if you forget to denoise/deinterlace it.
- Temporal Shimmering (Edge Crawling): Fine edges or patterns that appear well-defined on individual frames but flicker, shimmer, or pulsate when playing the video. This happens when the underlying model doesn’t have an understanding of time, creating edge data independently on each frame.
2. The 2026 Production Upscaling Stack
TAchieving an artifact-free master requires selecting an AI engine that offers granular control over edge calculations and temporal consistency.
Industry Desktop Standards
- Topaz Video AI (Personal/Pro): The definitive benchmark for high-end mastering. Features specialized models like Proteus (delivers deep manual slider configurations), Iris (optimized for low-resolution human faces), and Astra / Rhea XL (tuned specifically to upscale AI-generated video outputs cleanly).
- UniFab Video Upscaler AI: A highly optimized desktop GPU workhorse running fast rendering models like Vellum, which excels at broad environmental landscapes and complex real-world textures.
The Open-Source Option (100% Free)
- Video2X / Upscayl Free GUI/command-line app that leverages the most advanced AI models such as Real-ESRGAN and BasicVSR++. BasicVSR++ is widely celebrated for its ability to pass motion vectors across multiple frames, completely neutralizing temporal shimmering along edges.
3. Step-by-Step Pipeline to Prevent Edge Artifacts
To scale your footage without turning sharp lines into blocky noise, execute this precise workflow sequence inside your post-production suite:
1. Linear Bit-Depth Expansion
- Import the low resolution source clip (usually YUV 8-bit) into a 16-bit or 32-bit float RGB workspace. The higher the bit-depth of the digital workspace, the greater the numerical precision available for the math engine to compute the smooth gradient calculations along fine lines, without creating new color banding artifacts.
2. The
- Do not jump straight to 4K resolution. Run a 1× resolution cleanup pass using a specialized de-blocking model like Topaz Iris MQ or Nyx v3. This step targets and smooths out the blocky 8 x 8 square artifacts created by heavy video compression. Eliminating these compression errors ensures the upscaler wont mistake them for actual edges.
3. Calibrate Manual Model Sliders
- Switch your primary upscaler model (e.g., Proteus) to manual mode. Never trust default auto settings. Set Revert Compression to a high tier (75–85), set Reduce Noise to 40–50, and explicitly restrict the Dehalo / Sharpen sliders down below 15–20. Keeping sharpening low allows the model's detail recovery math to remain completely natural.
4. Render a Hard-Motion Preview Block
- Select a brief, 3-second segment of your footage containing rapid movement and high-contrast edges (such as a character walking past complex background structures). Render a local test loop and inspect the edges at 100% zoom. If you notice any faint halo outlines or pixel crawling, dial back the sharpness parameters immediately.
5. Execute the 4K Master Export
- Once the render loop passes through the render tests (see Part 2 above) the only thing left to do is render your entire block out to the final resolution and frame rate of 3840 x 2160 @ 24 FPS. Since you don’t want your new sharp edges getting squashed into oblivion once more when it is compressed, render to a professional-quality format container such as an Apple ProRes 422 HQ file, or a massive bit-rate H.265 (at minimum of 40–60 Mbps).
Tuning Settings Matrix
Visual Artifact Realignment · Pipeline Fine-Tuning Constraints
| Visual Problem | Core Technical Cause | Exact Slider Adjustments to Fix |
|---|---|---|
| White outline halos around subjects | Over-sharpening calculation errors. | Lower Sharpen to <15; increase Dehalo correction attributes. |
| Waxy, plastic human skin textures | Over-aggressive noise reduction filters. | Drop Reduce Noise below 50%; allow original grain to pass. |
| Edges shimmer during camera movement | Poor frame-to-frame temporal awareness. | Swap your model to a recurrent multi-frame choice like BasicVSR++ or Gaia. |
| Jagged stair-step diagonal lines | Residual interlace combing or compression noise. | Engage a dedicated Deinterlacing / De-block pre-pass at 1× scale. |
Request A Custom AI Video
Tell us what you're trying to create and we'll point you to the right tool — or help you set it up.
1. Under the Hood: The Convolutional Math of Halo Suppression
- The conventional upscaling filters, such as Bicubic or Lanczos, interpret an image matrix by examining the gradients in pixel arrays. However, whenever such filters encounter a sudden sharp edge (e.g., dark object against a bright sky background), their mathematical equations run into an extreme computational error called the Gibbs Phenomenon.
- Because simple algorithms try to maintain sharp contrast by abruptly cutting off pixel values, the math over-corrects, forcing the surrounding pixels to clip to maximum white. This error creates a noticeable, fake white halo outline around subjects.
- [Sharp Contrast Boundary] ➔ [Standard Math Interpolation] ➔ [Pixel Over-Correction] ➔ [White Halo Artifact]
- Advanced models like Topaz Rhea XL, Astra 2, or open-source BasicVSR++ architectures solve this problem by swapping out linear pixel multiplication for a specialized Sub-Pixel Spatial Convolution Layer.
- Instead of guessing pixel placement based purely on surrounding color values, the neural networks translate the entire image frame into an abstract tensor state. The model calculates Directional Flow Vectors along the edges. If the system detects a sharp edge, it maps the boundary using a sub-pixel layout matrix, smoothing out the surrounding pixel gradients to completely suppress white halo loops.
2. Advanced Multi-Frame Video Alignment Architecture
- However, the most irritating problem that arises during the process of artificial intelligence-based upscaling is the phenomenon known as “Temporal Shimmering” (or “Edge Crawling”). Whenever a user decides to process their standard image upscaler node (such as Real-ESRGAN), the artificial intelligence will process every individual frame separately. As the random noise and compression artifacts in frames differ slightly, the algorithm will create some unique edge shapes. As a result, when the video runs with 24 frames per second, the edges seem to shimmer rapidly.
- To lock down perfect edge continuity across your timeline, your workflow must deploy a Recurrent Temporal Multi-Frame Alignment Engine (such as a Spacetime Patch Diffusion framework):
- The model allocates a dual-direction VRAM memory buffer that tracks visual features across 5 to 7 surrounding frames simultaneously (t-3 through t+3). By evaluating motion paths bidirectionally, the AI verifies whether an edge boundary remains physically locked in space across time.
- If a fine detail remains consistent across the temporal window, the neural networks keep the underlying edge geometry locked in place across every single frame. This cross-frame validation completely eliminates shimmering artifacts during fast camera pans or tracking moves.
4K AI Upscaling Engine
Reconstruct missing spatial data, clean up edge halos, and scale video frames to true 4K UHD cleanly.
The absolute gold standard for offline, professional-grade processing is Topaz Video AI, which features specialized spatial-temporal model structures like Proteus, Iris, and Nyx built explicitly to fix digital errors. If you need a fully cloud-driven pipeline that doesn't rely on high-end local graphics cards, Pixop and AVCLabs Video Enhancer AI provide elite browser workflows. For developers managing high-volume server integrations, Tencent's Real-ESRGAN serves as the top open-source framework.
Traditional camera footage contains predictable grain structures caused by light hitting a physical lens sensor. AI-generated video, however, is built using text or image diffusion layers, which means it often carries unique digital textures like subtle pixel swimming, waxy fields, and compression boxes. Standard upscaling models will mistake these visual artifacts for actual textures and sharpen them into huge, blocky structural errors. Specialized networks (like the Iris model in Topaz) are trained specifically to identify and smooth out AI-generated textures before scaling the frame.
Edge halos are glowing, high-contrast outlines that appear around object borders, text elements, or silhouettes. They are triggered when the upscaling tool's sharpening parameters are set way too high. The AI tries so hard to define soft edge boundaries that it creates an unnatural line right next to them. To prevent this, open your workflow advanced settings panel and dial the "De-halo" slider up to roughly 30-40% while reducing the overall edge-sharpness parameter.
If an upscaling engine reconstructs video frames one by one without tracking the movement across time, the placement of the fine details will vary slightly frame-by-frame. When played back at standard speeds, this results in a distracting boiling, shimmering, or jittering look along edge boundaries. Activating a Multi-Frame Temporal Architecture (like Proteus or Chronos) forces the AI to cross-reference neighboring frames, ensuring details remain locked fluidly over the motion timeline.
Jumping directly from 480p to 4K requires a massive pixel multiplication step, forcing the neural network to completely fabricate up to 90% of the image data out of thin air. This extreme expansion almost always collapses into a soft, smeary, or cartoonish look. The professional strategy is to follow a Two-Step Upscaling Workflow: First, run a 2x upscale pass to take the 480p file up to a clean 1080p layout while focusing entirely on de-noising. Second, take that crisp 1080p master and run it through a final pass to hit your target 4K UHD bounds.
Never export your newly reconstructed 4K video directly into highly compressed streaming formats like low-bitrate MP4 or H.264, or the compression algorithm will immediately ruin your new details with ugly compression boxes. Always compile your final upscaled exports using uncompressed, edit-ready master codecs such as Apple ProRes 422 HQ or Avid DNxHR HQX. These pipelines preserve complete color depth and edge data throughout your editing pipeline.
Adhere strictly to this secure 3-Step Validation Routine: First, isolate a short 2-second test snippet from your shot that features heavy motion or intricate fine textures. Second, run manual tests using an adjustable model (like Proteus) to independently balance compression block removal, halo minimization, and detail recovery. Finally, inspect the generated frames closely under high zoom magnification to check edge sharpness before rendering the entire clip out to a high-bitrate ProRes master file.
Ready to try AI Videos?
Transform your ideas into cinematic video in seconds.