Prior to the advancement of technology, it took a lot longer to develop an engaging video from a written article due to the cumbersome steps of writing a script, recording a voiceover, and editing the video. However, with the introduction of next-generation artificial intelligence (AI) platforms, you can now create an entire "Blog-to-Video" project in less than 10 minutes.
Below is the entire process of how to get your article turned into a high-quality video stated in simple language and divided out into simple steps.
Step 1: Choose Your AI Video Generator (1 Minute)
Based on the type of video you wish to create, choose one of the leading “script to video” generators. This will be done through automation, where the software will take your blog link, generate a summary, choose background visuals, and even synthesize a voice-over for you.
- Pictory or InVideo AI: Choose between Pictory or InVideo AI, for an explainer video created with pure stock footage, texts and voice-over at the back.
- HeyGen or Synthesia: Choose between HeyGen or Synthesia, if you prefer an AI Avatar on the screen speaking out your blog.
- Digen AI Agent: Best if you have a longer blog post (up to 15 minutes) and want high-quality character consistency.
Step 2: Condense & Prep Your Content (3 Minutes)
Written words convey information differently than visual media do; for example, you can drop a 2,000-word blog into a video generator and expect your audience to watch it as if they were reading it. But the vast majority of people who view videos would simply turn off or tune out immediately upon opening it.
- Identify the Hooks: Open your blog and copy only the main headings, key points, and bullet list. You are looking for a tight written story that moves quickly.
- Utilize the One-Twenty-Word Rule: A general rule of thumb is the pacing of a video is about 120 words/minute. If you want to have a fast-paced 2-minute long video, then you need approximately 240 total words of text written.
- Add Visual Directions (optional but smart): With today's modern AI tools, you can add some visual cue notes directly into the written video script to help the visuals selection. For instance, if you were to put [Show line graph here] in front of the statistics, you have effectively pre-visualized exactly what visual should be displayed for those statistics.
Step 3: AI Generator (3 Minutes)
Time to let the AI do its thing.
1. Paste Your URL or Script
- Log into your chosen tool (like InVideo or Pictory). Choose the "Article to Video" option. Paste your blog post's direct URL or paste your condensed script into the text box.
2. Select Your Video Settings
- Select your aspect ratio. Select 16:9 (Landscape) if it’s for YouTube or your website. Select 9:16 (Vertical) if you’re creating a Short, TikTok, or Instagram Reel.
3.Select Your Voice and Visual Theme Template
- Select an AI voice actor. Modern AI voices are extremely lifelike—filter your selection by accent (US, UK), gender, and tone (professional, energetic). Finally, pick a visual theme template.
4. Generate the First Draft
- Click "Generate." The AI will automatically slice your text into logical scenes, pair each scene with matching background video clips or graphics, and generate the synchronized voiceover.
Step 4: Human Review & Final Polish (3 Minutes)
While AI can help you reach about 80 to 90% of your final output, it still doesn't do everything for you, so the last 3 minutes must be spent doing a quick check of the following:
- Fix Bad Layout and Typos: Take a look at the captions that were automatically generated by the software on the screen. Make sure the AI did not spell anything wrong or make a mistake with industry jargon.
- Swap Inadequate Images: Sometimes the AI picks a poor image for a particular caption or sentence. Use the tool’s internal media library to find something better (such as “team working” to instantly swap the clip).
- Test the Volume of Audio: Make sure the background music is not too loud to cover up your voiceover.
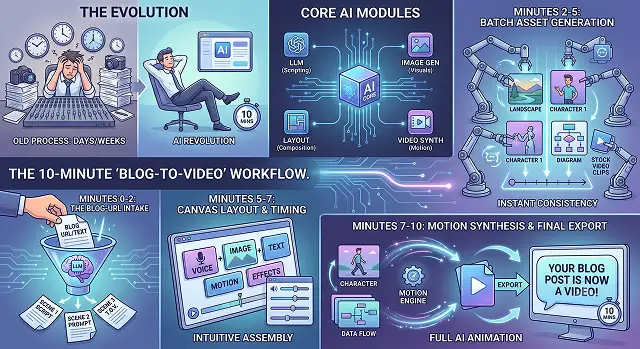
10-Minute Workflow: The Blueprint
High-Level Summary · Production Optimization Schedule
| Time | Phase | Focus | Core Action |
|---|---|---|---|
| Minute 1 | Select Tool | Form factor | Choose Explainer Video (InVideo/Pictory) or Avatar style (HeyGen/Synthesia). |
| Minutes 2–4 | Prep Script | Hook & Pace | Trim text to 130-150 words/minute. Convert dry, formal text to conversational speech. |
| Minutes 5–7 | AI Generation | Setup & Render | Paste script, select layout/aspect ratio (16:9 or 9:16), configure voice, and hit Generate. |
| Minutes 8–10 | Human Polish | Quality Control | Swap wrong visual elements, fix caption typos, and lower background music volume. |
Submit Your Application
Complete the form below to initiate your AI video generation project.
Phase 1: Choosing Your Machine (Minute 1)
You cannot afford to spend time wrestling with the wrong tool. Select your software based purely on your end goal:
Using 3D Forge, the entire process can be reversed by automating the process from days of manual labour down to 20 seconds to 5 minutes of automated time.
- The Faceless Route (InVideo AI & Pictory): These platforms operate like smart search engines. When you paste text, they scan the nouns and verbs, crawl stock libraries (like Storyblocks or Shutterstock), and stitch together relevant video clips. Best for: Tutorials, listicles, and faceless YouTube channels.
- The Avatar Routes (HeyGen & Synthesia): The technology involves using neural networks to create human motion and lip-synchronization.
The process entails selecting an avatar, pasting text, and mapping phonemes (speech sounds) to the lip frame by frame. Suitable for: LinkedIn thought
leadership, product demonstrations, and training.
Phase 2: The 3-Step Script Refactor (Minutes 2–4)
If you paste a standard Google-optimized blog post into an AI video tool, the voiceover will sound incredibly stiff. You need to adapt it for speech using three quick rules:
1. Kill the "Intro Fluff"
Blogs usually start with broad statements to ease the reader in. Videos require immediate retention hooks.
- Change this: "In today's digital landscape, optimizing your workflow is essential for productivity."
- To this: "You're losing hours every week to tasks an AI could do in seconds. Here's how to fix it."
2. Force Natural Cadence
- AI voice pronounces punctuations wonderfully. Use commas , to make the AI voice take a short breather and periods . to end sentences smoothly. Do not use semi-colons or parentheticals that will make AI voices confused about the sentence construction.
3. Make It Brevity-Based
Be concise according to the target platform's word limit:
- Short YouTube Video/Tiktok (60 seconds): Maximum 130–140 words.
- Explainer Video (2 minutes): Maximum 250–280 words.
Phase 3: The Human Quality Check (Minutes 8–10)
This is where you bridge the gap between "obviously generated by an AI" and "looks highly professional." Take your remaining three minutes to execute three surgical edits:
1. The Literal Metaphor Fix
- Because AI processes text literally, it often makes hilarious visual mistakes. If your script says, "Don't let your competitors leave you in the dust," the AI might literally pull a clip of someone sweeping dirt. Click that specific scene timeline, open the media tab, search for "Business Competition" or "Race Track," and click to swap it out.
2. Audio Ducking Balancing
Bad audio balances instantly ruin a video. Open the tool's advanced audio settings:
- Voiceover Track: Set to 0dB (Maximum clarity).
- Background Music Track: Adjust it from -18dB to -24dB. The track should have a sensation of faint beating in the background, without overshadowing the narration.
3. Captions Styling
- Captions need to be created so that they are as easy to understand as possible. Use only sans serif fonts (e.g., Inter or Arial), add text shadows or black outlines where required for contrast against bright backgrounds, and use three to five words per caption.
Blog to Video Workflow
Repurpose your written articles into high-impact social videos in minutes.
You can, but it's a bad idea. A long essay makes for a boring, rambling video script. Instead, use an AI Summarizer tool first. It will strip out the fluff and condense your article into short, punchy bullet points optimized for spoken audio. Aim for a script of roughly 150 to 200 words per minute of video.
It uses Semantic Context Matching. The AI reads each sentence of your summarized script and extracts key concepts. If your text says "boosting website traffic," the AI scans a massive library to instantly map in clips of growing analytical charts or people working on laptops. If you don't like a specific choice, you can swap it manually with one click.
No, unless you want to. Modern Text-to-Speech (TTS) engines feature hyper-realistic, human-sounding voice profiles complete with natural breathing patterns and inflection. If you do prefer your own voice layout but hate reading long scripts, you can clone your voice with a 30-second sample and let the AI read the whole article for you.
InVideo AI and Pictory.ai are the undisputed champions for turning text links into video. With both platforms, you literally just paste your live blog post URL. The AI scrapes the page, creates the script, applies the stock B-roll media, generates dynamic captions, and formats a timeline entirely on autopilot.
It does the exact opposite! Embedding a video onto your blog post drastically increases "Dwell Time"—the amount of time users stay on your page. Search engines love high dwell times, which signals that your content is valuable. Additionally, uploading the video to YouTube gives you a second chance to rank on search result pages.
Set up your AI Brand Kit before generating clips. Inside your editor dashboard, lock in your brand's hex color codes, upload your custom logo for automatic watermarking, and select your specific brand typography fonts for subtitles. This guarantees that every fast-generated clip instantly looks like it belongs to your business property.
Stick to a highly efficient 3-Step Sprint: Spend 2 minutes running the link through a summarizer to fix text boundaries, 5 minutes letting the video assembler generate the rough timeline and auto-caption styles, and the final 3 minutes manually swapping out any incorrect B-roll clips and hitting export.
Ready to try AI Videos?
Transform your ideas into cinematic video in seconds.