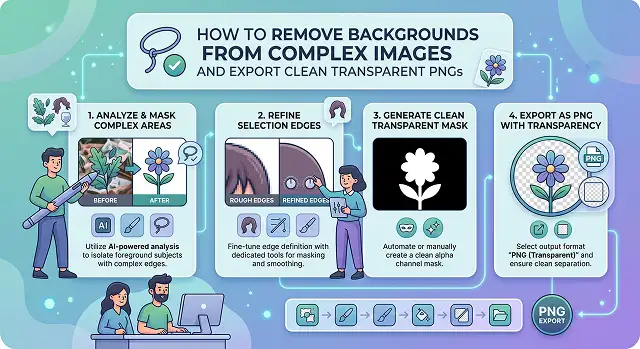
We have all been there: you need to cut out a subject from a photo, but they have wispy, flyaway hair, or they are holding a translucent glass of water, or perhaps it’s a pet with dense, fluffy fur. You run it through a basic background eraser, and the result is disastrous—the hair looks like it was chopped off with safety scissors, and an ugly neon "halo" outline ruins the edges.
Removing complex backgrounds used to require hours of tedious manual tracing and advanced channel masking in heavy design software.
Now, the pipeline has completely changed. You can isolate highly intricate subjects and export perfectly crisp, transparent PNGs directly in your browser. Here is the definitive, step-by-step workflow to master complex extractions without losing fine details.
Step 1: The 4-Step Complex Masking Process
In order to obtain a high-quality cutout that can be easily integrated into any design project without making it look "pasted," follow this technical process:
1. Prepare the High-Resolution Source Image
- Remember that you must always begin with the file in its highest resolution (JPEG or WebP). Do not compress the file beforehand. AI segmentation engines need maximum pixel clarity to tell the difference between a strand of blonde hair and a bright background highlight.
2. Run the Semantic AI Extraction Pass
- Upload your image to the web workspace. Let the neural net perform the heavy lifting. Avoid legacy "Magic Wand" tools that select pixels based only on flat color fields—this approach will completely wipe out semi-transparent elements.
3. Fine-Tune Using the Refine Edge Brush
- Open the preview workspace and toggle the background view to solid black. This immediately exposes hidden color fringe errors. Select the Refine Brush, set it to a small size, and lightly paint over complex transition areas (like hair tips or fuzzy jacket edges) to tell the AI to re-evaluate alpha opacity.
4. Export as a Full-Fidelity Transparent PNG
- Press the “export” button. Check that the format is set specifically to PNG (Portable Network Graphics). If you save it as a JPEG, the web server will automatically put a white or black box on your transparent canvas, thus destroying your efforts.
Step 2: Expert Tips for Working with "Nightmare" Backgrounds
If the background of the image is too cluttered, such as a model posed against fluttering green foliage or a bustling street scene, even the most advanced automatic system will fail to produce a flawlessly clean photo. Apply these expert photo editing corrections:
1. The Light-Wrap Illusion
Putting an isolated figure against a completely new background may cause some artificiality due to the difference between lighting in the original setting and the new one.
- The Fix: Put your transparent PNG into Canva or Premiere. Apply a very subtle, soft inner shadow or a thin low-opacity outer glow matched to the color of your new background. This creates a natural "light wrap" effect that visually blends your subject into the new space.
2. Defringe Color Correction
If your subject was originally photographed in front of a bright blue sky, their fine hair outlines will likely hold a tiny blue tint (called color spill).
- The Fix: Before dropping your transparent asset into a video or design project, apply a desaturation brush only to the very outer edges of the hair layout. Removing the rogue color tint instantly makes the edge strands look completely neutral and realistic against any backdrop.
Edge-Type Reference Matrix
Image Boundary Refinement · Workspace Brush Configurations
| Edge Material | Core Problem | Optimal Brush Size | Hardness Setting |
|---|---|---|---|
| Human Hair / Animal Fur | Color spill from background | 5px – 15px | 0% (Ultra-Soft Edge) |
| Glass / Translucent Plastic | Internal reflections | Large (Covers whole asset) | 20% |
| Fabric Clothing (Fuzzy Wool) | Anti-aliasing pixel blurring | 3px – 8px | 50% |
| Hard Objects (Metal, Wood, Box) | Jagged, pixelated staircasing | 2px – 5px | 95% (Hard Edge) |
Request A Custom AI Video
Tell us what you're trying to create and we'll point you to the right tool — or help you set it up.
Advanced Workflow: How to Manually Recover Masking Errors
Even the best AI engines can get confused when the color of your subject matches the background perfectly (e.g., a model blonde hair shot against a bright yellow wall). When the AI accidentally cuts into your subject, use this manual recovery workflow:
1. The Quick Layer Mask Trick
Never permanently erase your pixels using the eraser tool. Always deploy a Layer Mask.
- Black Conceals: Painting with a black brush on your layer mask hides the background.
- White Reveals: If the AI accidentally ate a chunk of your subject's arm or hair, switch your primary brush color to pure white and paint directly over the missing area to restore the raw data instantly.
2. High-Pass Contrast Boosting for Weak AI Layers
In case of the continuous absence of the required contour due to the insufficient contrast of the image, you may create the temporary "Contrast Boost" layer:
- Clone your layer, and use maximum values of the Contrast and Clarity/Dehaze sliders until the contour is very clear.
- Run the AI background extraction pass on this ugly, high-contrast layer.
- Once the engine generates the clean path outline, copy that selection mask, paste it back onto your beautiful original photo, and delete the temporary booster layer.
Deep-Dive: Advanced Matte Refinement Frameworks
When handling high-tier production work, relying completely on a one-click automated mask button isn't enough. True high-end extractions depend on an advanced process called Trimap Matting.
A trimap splits your image into three distinct spatial zones:
- Foreground (Absolute Subject): The definite, solid pixels you want to protect at 100% opacity.
- Background (Absolute Waste): The clear pixels that must be wiped out to 0% opacity.
- The Unknown Band (Transition Zone): The critical operational field where pixels hold a mix of both foreground and background data (like thin hairs or smoke).
Modern professional matting engines use advanced neural models to analyze this transition zone frame by frame. Rather than guessing blindly, the AI calculates the color value of the background and digitally subtracted it, leaving behind pure, unpolluted foreground strands.
Alpha Isolation & PNG Export
Master advanced edge extraction, color de-fringing, and pristine transparency compression arrays.
The optimal software depends entirely on your processing volume and control targets. For dedicated local workflows prioritizing hair, fur, and translucent structures, Aiarty Image Matting provides elite machine-learning processing. For developers running multi-thousands SKU ecommerce pipelines, Claid.ai and Photoroom API are the primary automation headers. For absolute manual pixel mastery on severe edge profiles, Photoshop's Select & Mask workspace remains the unshakeable gold standard.
Basic segmentation is a hard binary decision—every pixel is marked as either 100% subject or 100% background, causing blocky, jagged edges on complex areas. Professional AI Image Matting calculates fine-grained alpha transparency values between 0% and 100%. This allows the extraction layer to track semi-transparent elements—like loose hair strands, mesh fabrics, smoke, or glass reflections—without flattening their organic textures.
Color bleeding happens when ambient light from a bright background (like an outdoor neon sign or studio green screen) reflects onto the subject's edges. To fix this, utilize a workflow featuring Color De-fringing or Edge Contraction. Shifting the alpha matte edge inward by just a single pixel, or using a smart color decontamination brush, strips out the original backdrop color hue so the cutout blends naturally onto any new design layout.
Base this entirely on the final destination of your assets. For standard web development UI, mobile application graphics, or everyday social media layouts, a standard 8-bit PNG provides full transparency at minimal file weights. However, if your image requires extensive post-processing color grading or printing, export as a 16-bit PNG. This preserves thousands of color depth bands, preventing harsh pixel banding across soft gradients.
AI models tailored for portraits naturally try to apply soft feathering to edges. When isolating non-organic visual structures—like system dashboard screenshots, app interfaces, or flat typography logos—turn off soft matting functions. Switch the platform profile settings to a High-Contrast / Graphic Element model or manually adjust the extraction threshold. This keeps the vector line boundaries perfectly sharp and easy to read.
An alpha mask is a high-contrast black and white representation of your cutout, where absolute black represents the background and absolute white locks in the subject. Processing suites like Aiarty can export this black-and-white silhouette map right next to your transparent file. By loading the alpha map into an automated canvas script, you can easily review edge data and audit massive batches of cutouts for errors without manually opening every image file.
Follow this exact 3-Step Production Blueprint: First, run your high-resolution original file through an advanced neural matting network to generate the initial alpha channel transparency. Second, switch to a high-contrast black backdrop color block in your editor preview to immediately spot and clean up any remaining color fringes or halos. Finally, export your isolated element directly as an uncompressed 16-bit PNG master file, keeping all your future layout possibilities flexible.
Ready to try AI Videos?
Transform your ideas into cinematic video in seconds.