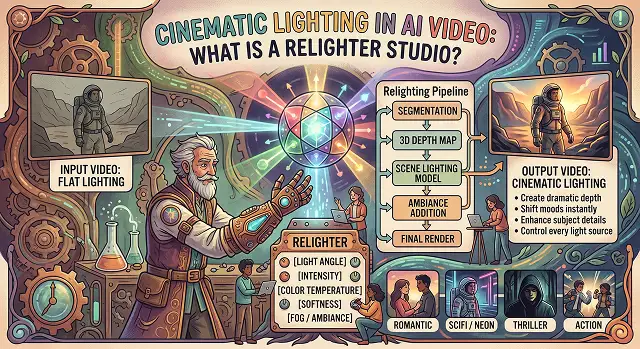
Poor exposure and flat lighting can ruin your film in the post production phase. Previously, if your clip had been badly lit, you would have needed to use complicated manual masks, color wheel, and keyframes.
Modern post-production has been transformed by the AI Relighter Studio (offered through platforms like OpenArt VFX, Runway, Magnific, and InVideo AI). By leveraging advanced computer vision, a relighter studio allows creators to drop virtual three-dimensional light sources over flat, pre-recorded 2D clips or AI-generated videos, completely altering the atmosphere of a scene in real time.
What is an AI Relighter Studio?
An AI Relighter Studio is a specialized rendering space that recalculates lighting physics over flat video files without deforming the original shapes, facial features, or character expressions.
Unlike traditional color grading software (which simply shifts existing pixel colors across the screen), an AI relighter tracks the hidden spatial layout of your 2D video. It maps depth zones and surface curvatures, allowing you to place new, dynamic spotlights, point lights, or ambient environmental glows directly into the scene. The software automatically recalculates realistic highlights, reflections, and shadow positions, giving flat footage the look of intentional, studio-lit Hollywood content.
So What Actually Is a Relighter Studio?
Relighting is an AI solution used for rebuilding lighting in photos and videos after filming. Relighting changes direction, intensity, hardness, and color temperature of the light source without simply increasing or decreasing the exposure. As you see, the word "studio" really means something: the idea is to mimic the process of working with light sources in the studio with all its possible nuances while not having real studio lights and reflectors.
The main difference between relighting and the usual brightness and contrast adjustments lies in the ability of relighting AI to understand the 3D space of the picture. In fact, AI recognizes the approximate position of the face, the object or the person on the picture, understands the position of the background, and based on these data defines how the new light will be distributed over the surfaces. That is why a successful relighting can generate the shadow under the chin of the person on the picture in the physically correct place and not simply increase the brightness.
How It Actually Works, Without the Jargon
Underneath the interface, most relighting tools follow roughly the same three steps:
- Find the subject and separate it from the background. This is similar to the segmentation work background removal tools do, identifying what is foreground versus background so lighting changes apply to the right area.
- Estimate depth and surface shape. This process is done through a guesswork by the machine about what areas of the object are close to the camera lens and what are far, curved or flat in their form, based on one two-dimensional image.
- Simulate new light hitting that surface. Once it has a rough shape to work with, it calculates how light from a chosen direction, color, and intensity would realistically fall across that surface, generating new shadows and highlights rather than editing the old ones.
That third step is the part that separates a genuine relighter from a simple filter. A filter changes pixel values uniformly. A relighter tries to simulate physics, even if it is doing so with a fairly rough guess at 3D shape rather than an actual depth sensor.
Relighting vs the Alternatives
What Each Approach Actually Fixes
| Approach | What It Actually Changes |
|---|---|
| Brightness / Contrast Slider | Uniformly adjusts how light or dark pixels appear. Does not change the direction shadows fall or add new depth. |
| Color Grading / Filters | Shifts tone and mood, warmer, cooler, moodier, but works with the existing lighting structure rather than rebuilding it. |
| AI Relighter | Estimates 3D shape, then simulates new light direction, softness, and color, generating physically plausible new shadows and highlights. |
| Reshooting With Real Lights | The genuine ceiling for quality and control, but requires equipment, setup time, and isn't possible for footage that's already been filmed and can't be redone. |
Request A Custom AI Video
Tell us what you're trying to create and we'll point you to the right tool — or help you set it up.
Photo Relighting vs Video Relighting — A Real Gap
Worth being direct about this: relighting a single photo and relighting a moving video clip are genuinely different problems, and the video version is meaningfully harder. A photo only needs one consistent, physically plausible lighting decision. A video needs that same decision to hold steady, frame after frame, without flickering or subtly drifting as the subject moves, which is a much bigger computational ask.
That gap shows up clearly across the current tool landscape. Several of the most capable relighters on the market today are built primarily for still photos, with video support either absent, limited, or noticeably rougher than the photo experience. If your footage involves a lot of movement, test a short clip before committing to relighting a full project, since results can vary more on video than the marketing pages tend to suggest.
A Few Tools Worth Knowing About
Higgsfield Relight is one of the more capable options for genuine 3D lighting control, letting you reposition a virtual light source, adjust color temperature, and toggle between hard and soft light using depth-mapping under the hood. It supports both photos and video, though like most tools in this space, the photo results tend to be the more polished of the two.
Filmora's AI Relight feature is genuinely built with video in mind, letting you place movable virtual light sources directly on a video preview and see shadows and highlights adjust in something close to real time. It is one of the more video-native options on this list rather than a photo tool with basic video support tacked on.
Unlike ImagineArt's Relight that is geared towards easy presets and 3D directional manipulation for amateurs, e-commerce professionals, and social media users rather than manual control, it can serve as a decent and effortless solution in case one wants to quickly improve flat lighting of the product photograph or portrait.
When it comes to purely video atmosphere and not relighting a portrait image specifically, applications such as Pika and Luma have a completely different approach, namely, creating lighting and weather effects during video generation rather than relighting video afterwards. Might be worth trying if one needs "cinematic atmosphere" and not "fix this poorly lit scene".
Relighting When It's Appropriate and When It Isn't
- Good fit: a "talking head" shot that was shot in either flat or slightly harsh light but requires a little bit more definition and depth and cannot be reshot.
- Good fit: product photography or short product clips where a consistent, professional-looking light source matters more than perfect physical accuracy.
- Weaker fit: footage with a lot of fast subject movement, where video relighting is more likely to flicker or look inconsistent frame to frame.
- Weaker fit: anything where the actual lighting is fine and the real problem is something else entirely, focus, framing, audio, relighting a well-composed but poorly-focused shot will not fix the underlying issue.
The relighter is an essential "rescue tool" but not a substitute for shooting in good light from the start. It bridges the "gap between acceptable and good, not between unacceptable and excellent."
AI Relighter Studio Mechanics
Master post-production illumination grids, depth map vectors, and dynamic shadow placement.
A Relighter Studio is a specialized AI application layout that allows you to alter the lighting environment of a video *after* it has been recorded or generated. Unlike basic contrast or color filters that flatten pixels, a Relighter reads the 3D geometry of your scene. This means you can add virtual studio lights, move their positions, change color temperatures, and create dynamic highlights that wrap naturally around characters and objects.
The top specialized engines include Magnific AI (Relight Editor) (outstanding for multi-light coordinate tracking and reference image style matching), Higgsfield AI (Cinema Studio) (the leading platform for director-style multi-angle scene lighting layout controls), and Runway (Relight Scene app) (perfect for rapid, prompt-driven atmospheric environment swaps like changing daylight to sunset). For local desktop editors, Wondershare Filmora features a powerful built-in AI Relight engine.
The engine applies a dual machine-learning pass consisting of a Depth Estimator and a Surface Normal Predictor. When you load your video file, the AI analyzes the pixel data to trace structural gradients—calculating the exact curves of a face, the angles of furniture, or background depth limits. It maps an unviewable 3D coordinate layer over your scene, allowing the virtual light sources to calculate realistic shadow falloffs and reflections.
Instead of positioning individual lights and adjusting sliders from scratch, a Reference Match workflow lets you clone styles directly from an example shot. You simply upload a cinematic movie still or a high-end studio portrait that possesses the specific mood you want. The AI reads its global illumination characteristics, color harmonies, and contrast ratios, and replicates that exact styling onto your own video assets instantly.
To keep environmental exposures clean, use a tool featuring Subject Masking / Layer Isolation (like Magnific or Filmora). Before adjusting parameters, turn on Portrait Relighting or isolate the background layer. This forces the neural network to contain light alterations strictly to the speaker's body outline, preventing your background shadows from shifting shapes uncomfortably.
Flickering happens when a relighting tool doesn't track frame data chronologically, recalculating light properties completely independently on every frame. To secure flawless results, make sure you choose an application featuring strong Temporal Continuity algorithms (like Higgsfield or Magnific Video). These systems calculate the overall motion trajectory first to keep the light source anchored smoothly across fast character actions.
Adhere strictly to this secure 3-Step Execution Pipeline: First, upload your base video clip into a tool like Higgsfield or Magnific and select a preset structure (like a studio key light or cinematic backlight mood) to act as your layout baseline. Second, adjust light positions on your workspace controller matrix to balance shadow drop-offs and skin temperature. Finally, generate a short preview to verify frame stability before exporting your high-definition master file.
Ready to Rescue Poorly Lit Footage?
Give your video the shape and depth it was missing, no reshoot required.